This is a work in progress. The description of a container and demo/simple is synchronized with the master branch of TIER/midPoint_container GitHub project. The rest will follow soon.
Introduction
Here we describe Docker image for midPoint that is to be used within the TIER IdM environment.
The image can be found in the TIER/midPoint_container GitHub project in the midpoint directory.
Besides the image itself, the project contains a couple of demonstrations of its usage:
| Demonstration directory | Description |
|---|---|
demo/simple | The simplest use of midPoint: just running it along with a dockerized MariaDB repository. |
demo/shibboleth | Shows how to use midPoint with the Shibboleth authentication. |
demo/postgresql | Demonstration of how to use an alternative repository instead of MariaDB-based one. |
demo/complex | This is a more complex demonstration of the use of midPoint image in a wider environment consisting of Grouper, Shibboleth, LDAP directory, RabbitMQ messaging, and sample source and target systems. |
Getting started (simple demo)
The image cannot be "run" by itself as it requires a midPoint repository - i.e. an SQL database - to execute. So the easiest way how to start dockerized midPoint is to use one of the provided demonstrations. The most logical choice for the first run is demo/simple.
$ git clone https://github.internet2.edu/TIER/midPoint_container.git
$ cd midPoint_container/demo/simple
$ docker-compose up
Until the build is stabilized enough (now it is not!) it is much safer to build your own images as described below.
Building own images
The above commands downloaded tier/midpoint image from the Docker hub. Alternatively, you can build this image yourself. Here is how:
$ git clone https://github.internet2.edu/TIER/midPoint_container.git
$ cd midPoint_container
$ ./build.sh
$ cd demo/simple
$ docker-compose up
(Note the build.sh has a -n switch that skips downloading the midPoint distribution archive, saving some time during repeated builds.)
After starting
After docker-compose up command successfully finishes you should see something like this on the console:
midpoint_server_1  | midpoint;midpoint.log;demo;;2018-09-20 16:25:22,191 [] [main] INFO (org.springframework.boot.web.embedded.tomcat.TomcatWebServer): Tomcat started on port(s): 8080 (http) 9090 (http) with context path '/midpoint'
midpoint_server_1  | midpoint;midpoint.log;demo;;2018-09-20 16:25:22,209 [] [main] INFO (com.evolveum.midpoint.web.boot.MidPointSpringApplication): Started MidPointSpringApplication in 60.512 seconds (JVM running for 61.688)
Now you can log into midPoint using https://localhost:8443/midpoint URL, with an user of administrator and a password of 5ecr3t.
Configuring the container (general information)
The lowest level of configuration of the midPoint container is during its inclusion into a Docker composition. There is the full set of environment properties and other configurable items (e.g. Docker secrets and configs) available.
During the composition some of the environment properties can be made accessible from the outside. This depends strictly on the compositor. The demonstrations here show some of the options.
How to set environment variables after composition is done
After the composition is done, you can set the environment variables like this:
$ export ENV="test" USERTOKEN="3.9" MP_MEM="4096m"
$ docker-compose up
Or like this:
$ env ENV="test" USERTOKEN="3.9" MP_MEM="4096m" docker-compose up
How to set Docker secrets and configs
The way of accessing secrets and configs is specific to the composition. In our demonstrations these are stored in the configs-and-secrets directory. They are provided to midPoint containers in appropriate ways. (Currently, secrets are passed as Docker secrets, configs are mounted as volumes. This might be changed in the future.) For detailed information on individual items please see the following sections.
Configuring specific container features
In this section we describe how to configure and use specific features of this midPoint dockerization.
Repository
Repository configuration is done via the following environment variables.
| Environment variable | Meaning | Default value |
|---|---|---|
REPO_DATABASE_TYPE | Type of the database. Supported values are mariadb, mysql, postgresql, sqlserver, oracle. It is possible to use H2 as well but H2 is inappropriate for production use. | mariadb |
REPO_JDBC_URL | URL of the database. | MariaDB: MySQL: PostgreSQL: SQL Server: Oracle: |
REPO_HOST | Host of the database. Used to construct the URL. | midpoint_data |
REPO_PORT | Port of the database. Used to construct the URL. | 3306, 5432, 1433, 1521 for MariaDB/MySQL, PostgreSQL, SQL Server and Oracle, respectively |
REPO_DATABASE | Specific database to connect to. Used to construct the URL. | registry |
REPO_USER | User under which the connection to the database is made. | registry_user |
REPO_PASSWORD_FILE | File (e.g. holding a docker secret) that contains the password for the db connection. | /run/secrets/mp_database_password.txt |
REPO_MISSING_SCHEMA_ACTION | What should midPoint do if the database schema is missing (options: warn, stop, create). | create |
REPO_UPGRADEABLE_SCHEMA_ACTION | What should midPoint do if the database schema is obsolete but upgradeable (options: warn, stop, upgrade). As of midPoint 3.9, the only automated transition available is from 3.8 to 3.9. | stop |
REPO_SCHEMA_VERSION_IF_MISSING | For midPoint versions before 3.9 that do not have schema information explicitly stored in the database, this parameter allows specifying the version externally. It can be used for automated upgrade from 3.8 to 3.9. (In such cases, specify it to be 3.8, assuming this is your schema version.) | |
REPO_SCHEMA_VARIANT | Used to specify what schema variant is to be used for automated creation or upgrade of the database schema. Currently the only known variant is Beware: it is the administrator's responsibility to choose the correct variant! Currently midPoint does not try to determine the variant present in the database. So be sure to avoid applying e.g. |
For automatic schema creation and upgrade options please see Schema creation and updating section in midPoint documentation.
Note that in order to connect to the database you have to provide the password. For security reasons, we use the indirect way through file access. So, typically you provide the following Docker secret:
| Secret | Meaning | Typical location in demonstration scenarios |
|---|---|---|
mp_database_password.txt | A password used to access the repository (relates to REPO_USER). | configs-and-secrets/midpoint/application/database_password.txt |
Of course, you can provide the password file in any other way, assuming you correctly set REPO_PASSWORD_FILE environment variable.
Logging
Logging is configured by setting the following environment variables:
| Environment variable | Meaning | Default value |
|---|---|---|
ENV | environment (e.g. prod, dev, test) | demo |
USERTOKEN | arbitrary user-supplied token |
According to the specification, semicolons and spaces in these fields are eliminated. We decided to replace them by underscores.
Authentication
This midPoint dockerization supports two authentication mechanisms.
| Mechanism | Description |
|---|---|
internal | Users are authenticated against midPoint repository. Login name to be used is the name property of the user, and the password is credentials/password/value property. |
shibboleth | Users are authenticated against Shibboleth IdP. This is ensured using Shibboleth SP (service provider) module for Apache httpd configured as reverse proxy for midPoint. |
Authentication configuration is done using the following environment variables.
| Environment variable | Meaning | Default value |
|---|---|---|
AUTHENTICATION | Authentication mechanism to use | internal |
LOGOUT_URL | URL to be used for logout (used for Shibboleth authentication) | https://localhost:8443/Shibboleth.sso/Logout |
SSO_HEADER | Shibboleth attribute to be used as a login identifier. It is matched against name property of the user when logging in. When changing it, do not forget to change your Shibboleth IdP configuration as well as midPoint's shibboleth2.xml configuration file. | uid |
Note that besides these variables you have to provide the following files. They are necessary for the Shibboleth service provider module.
| File | Description | Typical location in demonstration scenarios |
|---|---|---|
/etc/shibboleth/idp-metadata.xml | Metadata related to Shibboleth identity provider | configs-and-secrets/midpoint/shibboleth/idp-metadata.xml |
/etc/shibboleth/shibboleth2.xml | Service provider configuration | configs-and-secrets/midpoint/shibboleth/shibboleth2.xml |
/etc/shibboleth/sp-cert.pem | Service provider certificates file | configs-and-secrets/midpoint/shibboleth/sp-cert.pem |
And the following Docker secrets are to be provided:
| Secret | Description | Typical location in demonstration scenarios |
|---|---|---|
mp_sp-key.pem | Service provider private key | configs-and-secrets/midpoint/shibboleth/sp-key.pem |
Other
Other aspects can be configured using the following variables and Docker secrets or configs.
| Environment variable | Meaning | Default value |
|---|---|---|
MP_MEM_MAX | The limit for Java heap memory (-Xmx setting) | 2048M |
MP_MEM_INIT | The initial amount of Java heap memory (-Xms setting) | 1024M |
MP_JAVA_OPTS | Any other Java options to be passed to midPoint | |
| File (e.g. holding a docker secret) that contains the password for the midPoint keystore | /run/secrets/mp_keystore_password.txt |
MP_DIR | midPoint home directory. Do not change until absolutely necessary, as the change might break many things. | /opt/midpoint |
Other files that are necessary are:
| Item | Meaning | Location |
|---|---|---|
/etc/pki/tls/certs/host-cert.pem | Host certificate for Apache httpd | configs-and-secrets/midpoint/httpd/host-cert.pem |
/etc/pki/tls/certs/cachain.pem | Certificate chain for Apache httpd | configs-and-secrets/midpoint/httpd/host-cert.pem |
And the following Docker secrets are to be provided:
| Item | Kind | Meaning | Location |
|---|---|---|---|
mp_host-key.pem | secret | Private key for Apache httpd | configs-and-secrets/midpoint/httpd/host-key.pem |
mp_keystore_password.txt | secret | Java keystore password used by midPoint e.g. to encrypt sensitive information stored in the repository. | configs-and-secrets/midpoint/application/keystore_password.txt |
Alternative repository demonstration
In order to quickly verify the ability to configure alternative repository location we have provided a sample PostgreSQL container in demo/postgresql directory. There are two ways how to invoke it:
- PostgreSQL can be started as part of the midPoint composition.
- PostgreSQL can be started independently of the midPoint composition.
Starting PostgreSQL as part of the midPoint composition
$ cd midpoint
$ docker-compose -f docker-compose.yml -f ../demo/postgresql/midpoint-additions.yml up midpoint-server postgresql
The midpoint-additions.yml composition file looks like this:
services:
  postgresql:
    build: ../demo/postgresql/postgresql/
    environment:
     - POSTGRES_PASSWORD=password
    expose:
     - 5432
    ports:
     - 5432:5432
    networks:
     - back
    volumes:
     - postgresql_data:/var/lib/postgresql/data

  midpoint-server:
    environment:
     - REPO_DATABASE_TYPE=postgresql
     - REPO_HOST=postgresql
     - REPO_DATABASE=midpoint
     - REPO_USER=midpoint

volumes:
  postgresql_data:
Notes:
- The first service declaration (
posgresql) creates a container hosting the new repository. - The second service declaration (
midpoint-server) adds a couple of environment variables needed to tell midPoint how to access the new repository.
You can safely ignore console messages like this:
postgresql_1       | ERROR:  could not serialize access due to read/write dependencies among transactions
postgresql_1       | DETAIL:  Reason code: Canceled on identification as a pivot, during write.
postgresql_1       | HINT:  The transaction might succeed if retried.
This is a part of standard midPoint conflict resolution process. The mentioned transactions are really retried and they succeed eventually.
Starting PostgreSQL independently of the midPoint composition
$ cd demo/postgresql
$ docker-compose up
and
$ cd midpoint
$ docker-compose -f docker-compose.yml -f ../demo/postgresql/midpoint-additions-for-standalone-run.yml up midpoint-server
Here the additional compose file looks like this:
services:
  midpoint-server:
    environment:
     - REPO_DATABASE_TYPE=postgresql
     - REPO_HOST=postgresql
     - REPO_DATABASE=midpoint
     - REPO_USER=midpoint
    networks:
     - postgresql_net

networks:
  postgresql_net:
    external: true
We need this file mainly to allow midpoint-server container to directly communicate with the postgresql host (via postgresql_net network). Setting of the environment variables could be done also from the command line, as will be seen in the following example.
Note that the PostgreSQL database will be different from the database created in the first case. The first one resides in midpoint_postgresql_data volume, this one in postgresql_data volume.
Using an externally provided repository
Here we show how to use externally provided repository. We have chosen Oracle as an example; mainly because it requires adding custom drivers to midPoint.
The custom drivers reside in lib subdirectory of midPoint home directory. The home directory is available as a Docker volume with a default name of midpoint_midpoint_home (assuming midPoint was started at least once - so please if you have not started it, do it at least once with a standard configuration before trying this). After downloading the Oracle driver you can copy it into the appropriate place using e.g. for following command:
$ sudo cp ~/Downloads/ojdbc7.jar /var/lib/docker/volumes/midpoint_midpoint_home/_data/lib
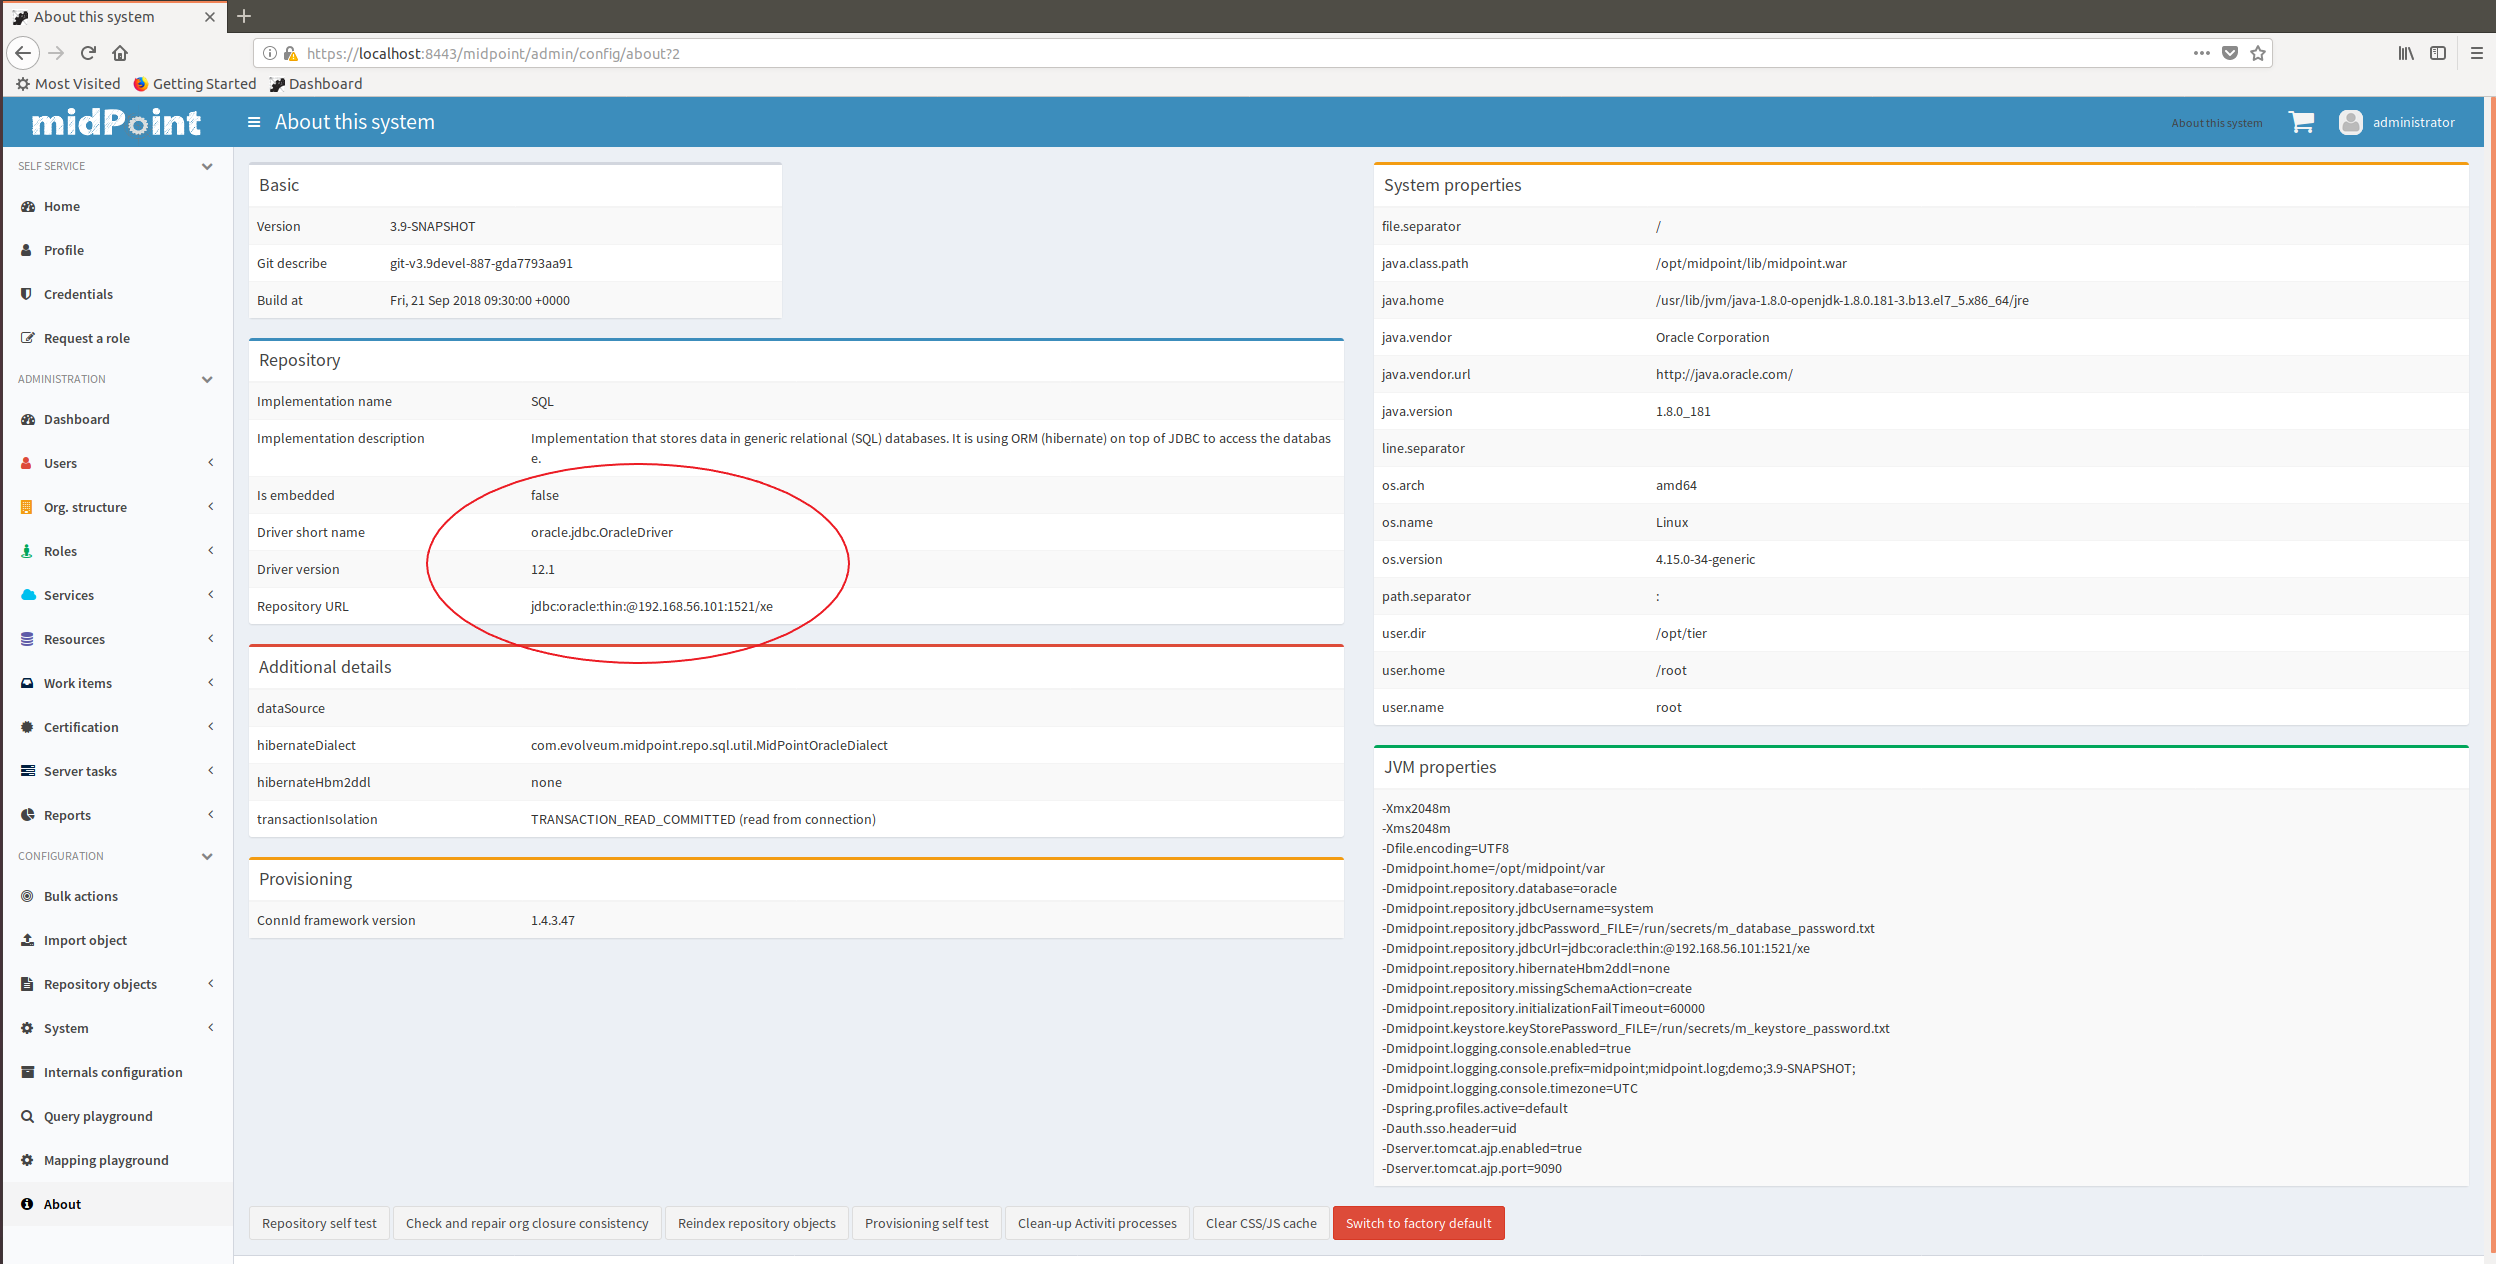
Let us assume that our server is available on host 192.168.56.101. We can then tell midPoint to connect to the Oracle database using the following command. (Do not forget to set the correct password in configs-and-secrets/midpoint/application/database_password.txt as shown below.)
$ cd midpoint
$ echo oracle > configs-and-secrets/midpoint/application/database_password.txt
$ env REPO_DATABASE_TYPE=oracle REPO_HOST=192.168.56.101 REPO_USER=system docker-compose up midpoint-server
After successful start of midPoint you can login and check that the database is really an Oracle one.