Logo and Custom Resources
If you wish only to add a logo to Registry, you may place your logo into local/webroot/img/logo.png. The logo should be 50px high, have a transparent background, and be in PNG format. For more explicit control over the Logo and other elements, consider creating a Custom Theme (which also provides the option of pointing to an external logo). Custom Themes are available as of v2.0.0.
For versions prior to v1.0.0, you must replace the default image file that is located at app/webroot/img/comanage-logo.png.
![]() Custom logos per CO are not currently supported when deployed to the file system in this way (CO-1325), but this can be overcome by creating a Custom CO Theme as described below.
Custom logos per CO are not currently supported when deployed to the file system in this way (CO-1325), but this can be overcome by creating a Custom CO Theme as described below.
Custom Resources
If you don't wish to point to a different server for images or other custom resources from your theme and would prefer to keep them on the same server as Registry, you can create a symlink in app/webroot to point at resources in local/webroot. For example from the root of your Registry project:
mkdir local/resources
cd app/webroot/
ln -s ../../local/webroot/resources local-resources
and now you will be able to reference images and other resources at /registry/local-resources/some-image.png.
Custom CO Themes & Custom Global Theme
As of v2.0.0, custom themes can be defined within each CO and used in various contexts. A custom theme defined for the COmanage CO can be applied globally, including unauthenticated contexts.
Themes can be added via Configuration >> Themes, and currently support the following options:
- CSS: Custom CSS to be used by the theme
- Header: Custom HTML to be emitted at the top of each rendered page
- Footer: Custom HTML to be emitted at the bottom of each rendered page
- Hide Footer Logo: If set, the "Powered by COmanage" logo will be suppressed
- Hide Title: If set, the title bar displaying the CO name and logo will be suppressed (NOTE: as of 4.0.2 this only hides the Title in the banner. See "Tips and Tricks" below for hiding the entire title bar. This issue has been corrected in version 4.1. See: CO-2414 - Getting issue details... STATUS )
After the theme has been defined, it can be attached to one of the following contexts (which are evaluated in order of priority as listed here):
- Enrollment Flows: The theme will be rendered for petitions created from the specified Enrollment Flow
- CO Settings: The theme will be rendered for all pages associated with the CO
- COmanage CO Settings: In addition to being used for all pages associated with the COmanage CO, the theme will be used by default platform wide when no other theme has been selected
As of v4.0.0, custom themes can be stacked. Theme stacking mode is configurable (enabled/suspended) in one of the following contexts:
- Enrollment Flows: The theme will be appended to any parent (CO or Platform) custom Theme and will be rendered for the petitions created from the specified Enrollment Flow
- CO Settings: The theme will be appended to any parent (Platform) custom Theme and will be rendered for all pages associated with the CO
![]() Currently custom Headers and Footers can not be stacked. They are inherited from the top level.
Currently custom Headers and Footers can not be stacked. They are inherited from the top level.
Theme Stacking feature defaults to suspended mode, which matches the behavior prior to v4.0.0.
Building a Custom Theme
CSS from a custom theme is applied last in the cascade and can override any part of COmanage's styles. When developing a custom theme, you can choose to include only CSS, or you can include CSS in combination with a custom header, footer, or both.
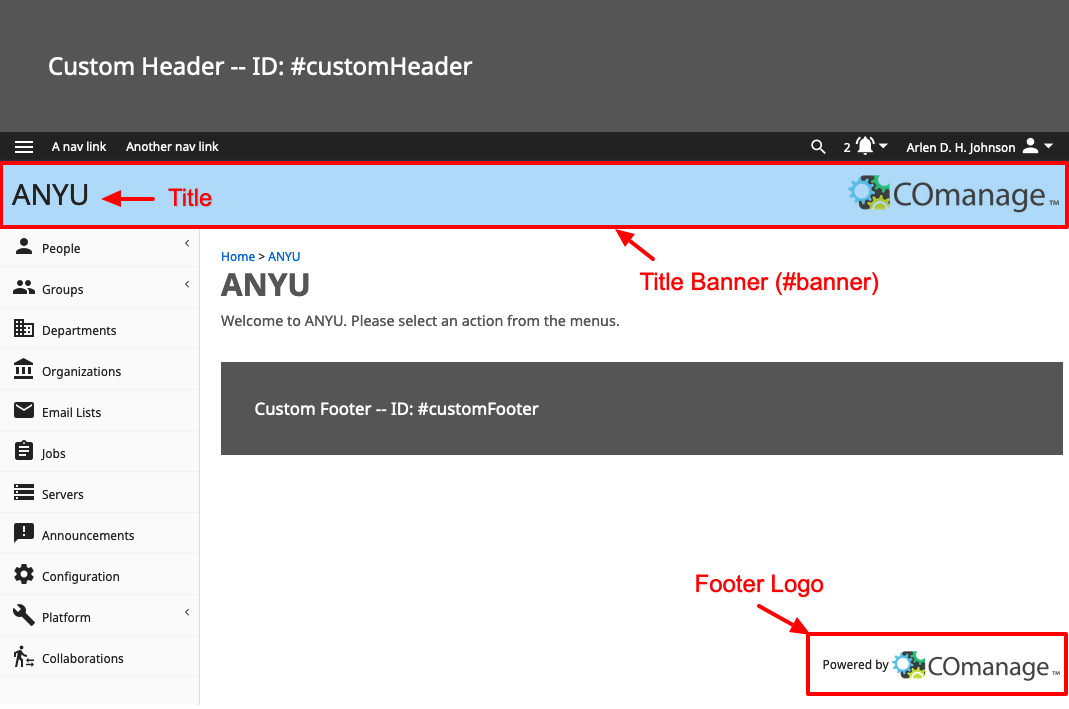
Output for the custom header will appear above all other elements in the following <header> tag:
<header id="customHeader">
  <div class="contentWidth">
    <!-- your custom markup will appear here -->
  </div>
</header>
Similarly, output for the footer will appear below all other elements of the <main> content in the following <footer> tag:
<footer id="customFooter">
  <div class="contentWidth">
    <!-- your custom markup will appear here -->
  </div>
</footer>
A step-by-step example
First, build the theme:
- As a CO administrator, visit Configuration > Themes.
- Click Add Theme (or edit an existing theme).
- Provide a name for your theme in the Name field, e.g. "Test Theme".
In the header, footer, and CSS fields provided, add the following content:
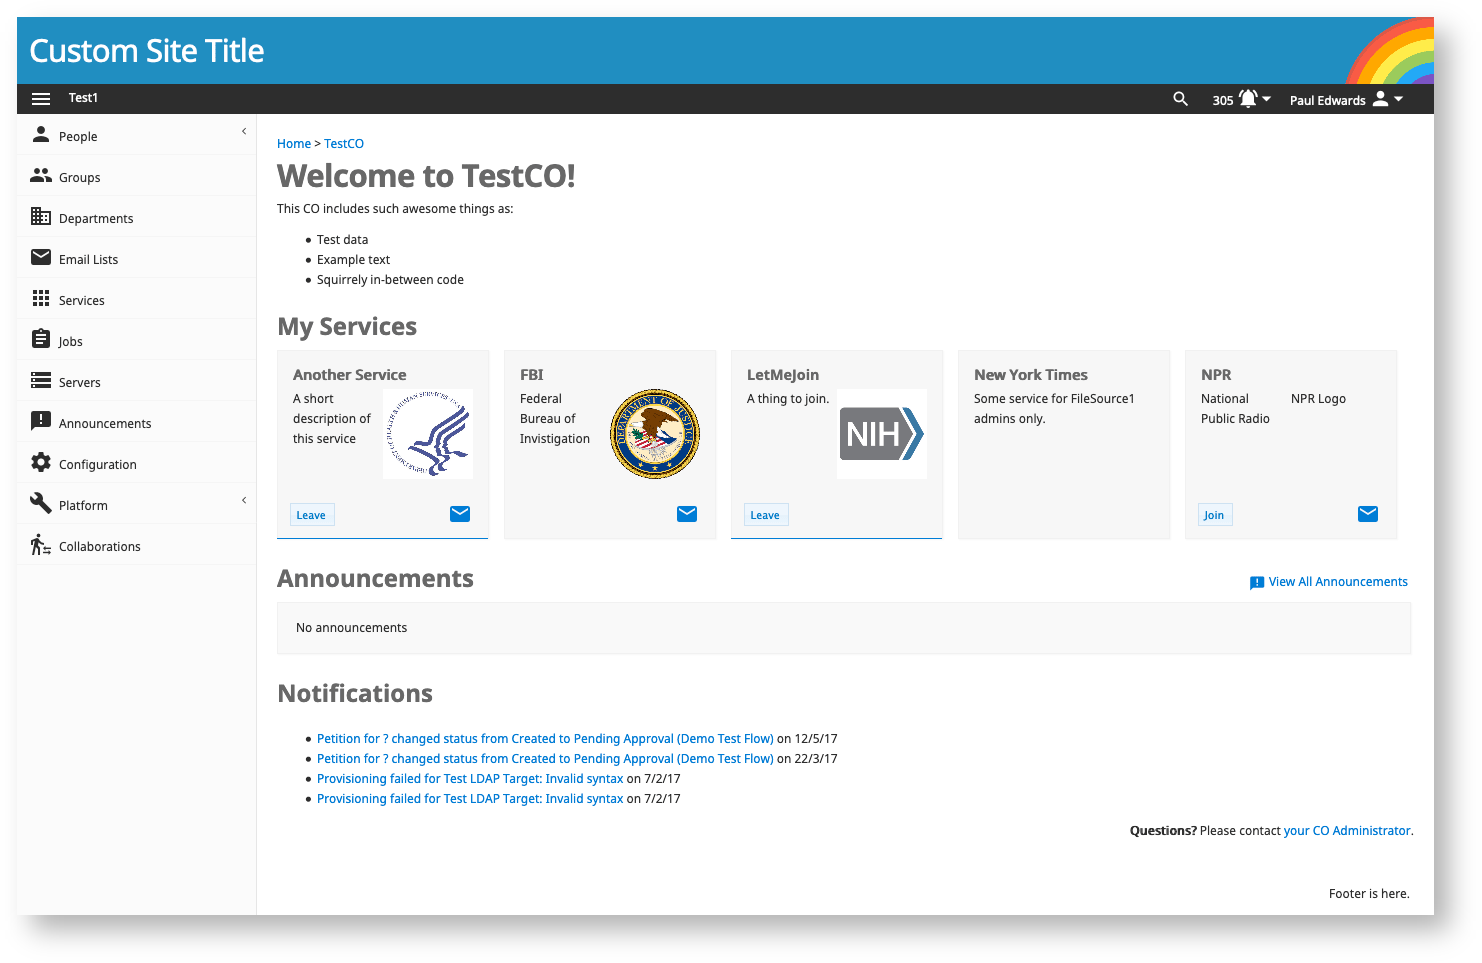
Example Markup for CO Custom Theme<!-- example markup for your header field. Note that if you want the title to link to a specific CO, use the correct CO ID in the URL here. --> <h1><a href="/registry/co_dashboards/dashboard/co:2">Custom Site Title</a></h1> <img id="rainbow" src="https://upload.wikimedia.org/wikipedia/commons/d/d9/Rainbow_Emoji.png"/> <!-- example markup for your footer field --> <p>Footer is here.</p> <!-- (Note that markup in the header and footer is optional and depends only on your needs.) --> <!-- some quick and dirty example styles for the CSS field (Registry version 3.0) --> #banner { display: none !important; } #customHeader { padding: 1em; background-color: #1d7ab4; color: white; } #customHeader h1 a { color: white; } body.logged-in .mdl-layout__drawer { top: 97px; } #top-menu a { color: white !important; } #rainbow { position: absolute; right: -5px; top: -5px; width: 100px; } #top-menu #user-panel a { color: #222 !important; } #top-menu #notifications a { color: #06c !important; }
- Select the checkboxes to Hide Title and Hide Footer Logo.
- Save your theme.
Next, apply the theme:
- Visit Configuration > CO Settings (to apply the theme to the entire CO).
- At the bottom of the settings form, select your newly created theme from the drop-down list.
- Save the configuration.
Your CO should immediately change to look something like this:
An example changing the color scheme
First, build the theme:
- As a CO administrator, visit Configuration > Themes.
- Click Add Theme (or edit an existing theme).
- Provide a name for your theme in the Name field, e.g. "Test Theme".
In the CSS field add the following content:
Example Markup for CO Custom Theme (Registry version 3.0)header.mdl-layout__header, #main-menu .mdl-ripple, #peopleAlphabet a:hover { background-color: #058B8C; } th, .ui-widget-header, .co-grid .co-grid-header, #pagination { background-color: #058B8C; color: white; } a, #main-menu > li li a, #main-menu li li a.selected, .widget-actions .material-icons { color: #028b8c; }- Save your theme.
Next, apply the theme:
- Visit Configuration > CO Settings (to apply the theme to the entire CO).
- At the bottom of the settings form, select your newly created theme from the drop-down list.
- Save the configuration.
Your CO should immediately change to look something like this: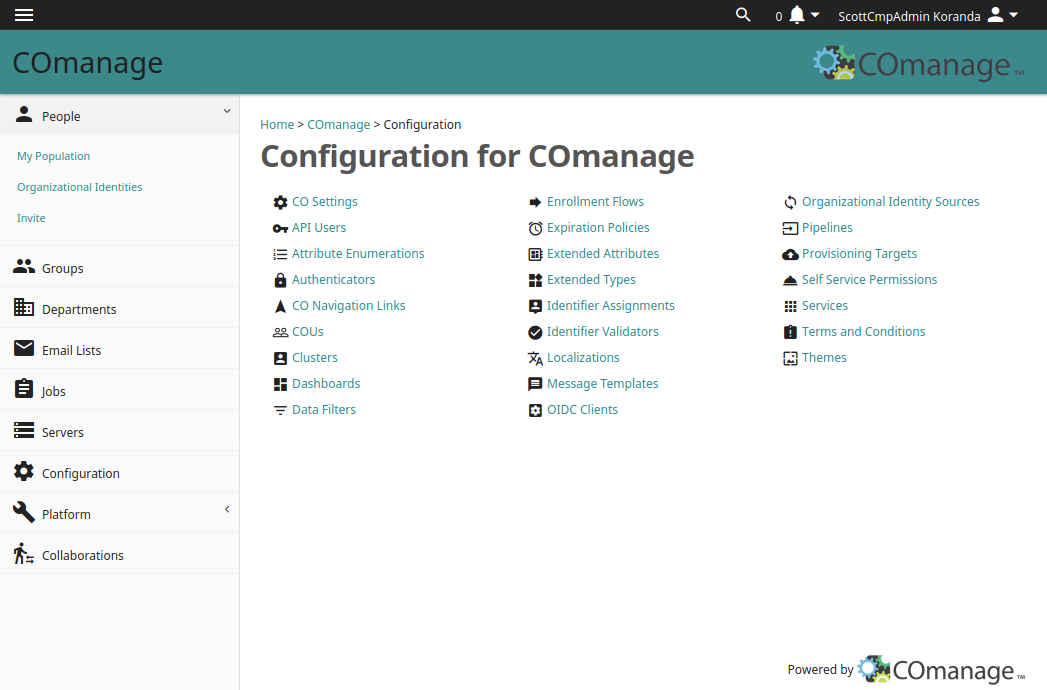
Caveats
Be aware that using custom markup can break your page layout, so be sure to use valid HTML code in your header and footer. Also, because all recent versions of COmanage are responsive, you may wish to test your theme on phones, tablets, and different desktop sizes.
Image upload is not supported. If you wish to include custom images, they will need to be available on a web server and over HTTPS (for production). See "Custom Resources" above if you wish to serve images and other resources from the Registry server.
See Also: cm_co_themes
Tips and Tricks
Hiding the COmanage Banner
At the moment, checking the "Hide Title" checkbox in a theme only hides the title (see: CO-2414). To completely hide the banner with CO Title and COmanage logo, add the following CSS to your theme's CSS field:
#banner {
  display: none;
}
Moving the Footer
For legacy reasons, the #customFooter element in Registry is placed within the <main> section of Registry's layout. If you wish to move the footer, add the following code snippet to the theme's Footer field:
<script>
  $(function() {
    $("#customFooter").detach().appendTo("#comanage-wrapper");
  });
</script>
Note that this is JavaScript making use of jQuery that ships with registry.
Example of a "Clean" theme with no COmanage Banner and a moved Custom Footer:
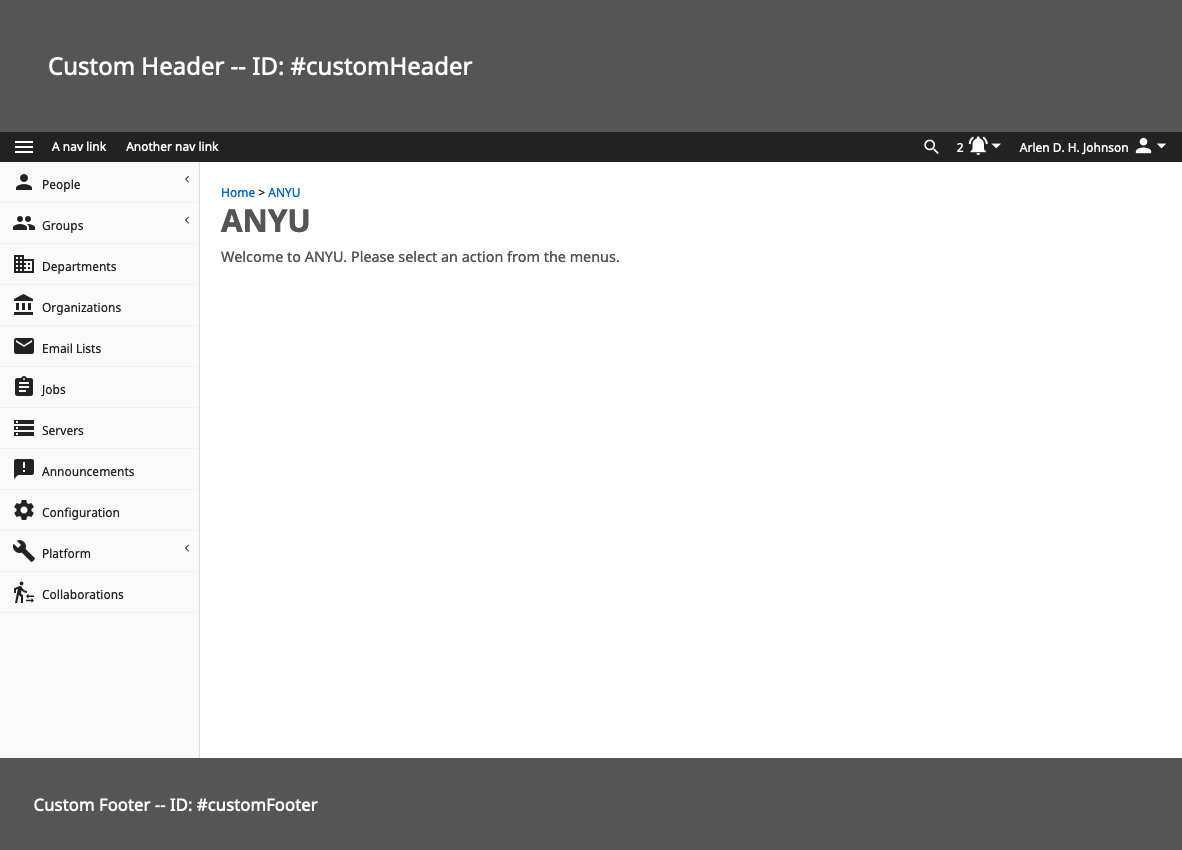
The theme above was built by placing the following values in the theme fields:
- Theme Name: "Demonstration Theme"
- Hide Title: leave unchecked – we will hide the entire COmanage banner using CSS
- Hide Footer Logo: checked
Header
Theme's Header Field<div id="demo-head">Custom Header -- ID: #customHeader</div>
Footer
Theme's Footer Field<div id="demo-foot">Custom Footer -- ID: #customFooter</div> <script> $(function() { $("#customFooter").detach().appendTo("#comanage-wrapper"); }); </script>CSS
Theme's CSS Field#customHeader { font-size: 2em; padding: 2em; background-color: #555; color: white; } #customFooter { font-size: 1.4em; padding: 2em; background-color: #555; color: white; } #banner { display: none; } #navigation-drawer { min-height: calc(100vh - 254px); }Note: the #navigation-drawer is set to run the full viewport height when the page does not fill the space from top to bottom. If you wish to keep a clean connection between the navigation drawer and your custom footer without a large gap at the bottom of the screen and without unnecessary scrolling you need to account for the height of the custom banner and subtract it from the viewport height as shown in this example.
Note: Registry version 5.x will move the customFooter to sit at the bottom of the layout. It is possible you will need to adjust your theme to accommodate this on upgrade.
Hiding the Left Menu Drawer
There are times - particularly during enrollment flows - in which you may wish to fully hide the left menu drawer from authenticated users. Because of legacy behavior for managing the menu drawer toggle, the menu drawer will unhide when the browser is resized to any desktop dimension. Therefore applying "display: none" to the drawer is not enough. To hide the navigation drawer completely, throw it out of the DOM by adding the following to your theme's footer:
<script>
  $(function() {
    $("#navigation-drawer").remove();
  });
</script>
Custom jQuery Color Schemes
Custom jQuery UI themes are not supported in v2.0.0 and later. As of v2.0.0, use CO Themes instead. jQuery UI will be removed in Registry version 5.0.0.
If you decide to customize the jQuery UI theme, note that you will need to manually track the correct version of jQuery UI and re-install your customized theme each time you upgrade Registry. (CO-1129)
The basic color scheme can be modified by downloading a theme from http://jqueryui.com/themeroller/ and unpacking the theme folder (e.g. smoothness, start, redmond) into app/webroot/js/jquery/ui/css/. Be sure to use the same jQuery UI version that Registry currently uses, which can be found via Version Dependencies.
Open app/views/layouts/default.ctp and change the appropriate reference to the location of the css file of the new theme.