This how-to describes how to set up a Grouper development environment so that you can code, test, and debug Grouper.
This page is specific to Grouper 2.5.
Instructions for Grouper 2.4 are found at How to Setup a Grouper Development Environment for Grouper 2.4.
This is a "no build" dev env where
- the developer does not run ant or maven on an ongoing basis
- the IDE compiles java classes and copies files around so that Java classes can be run (e.g. unit tests, grouper shell, grouper client, any main())
- the UI and WS webapp is ready be run by Tomee without any ant or maven, and just uses the compiled classes and files from the IDE
- no grouper dependencies need to be compiled or built or copied it is all done by the IDE automatically
Developers should understand how it works since it is a little involved
Troubleshooting
Grouper dev env high level diagram
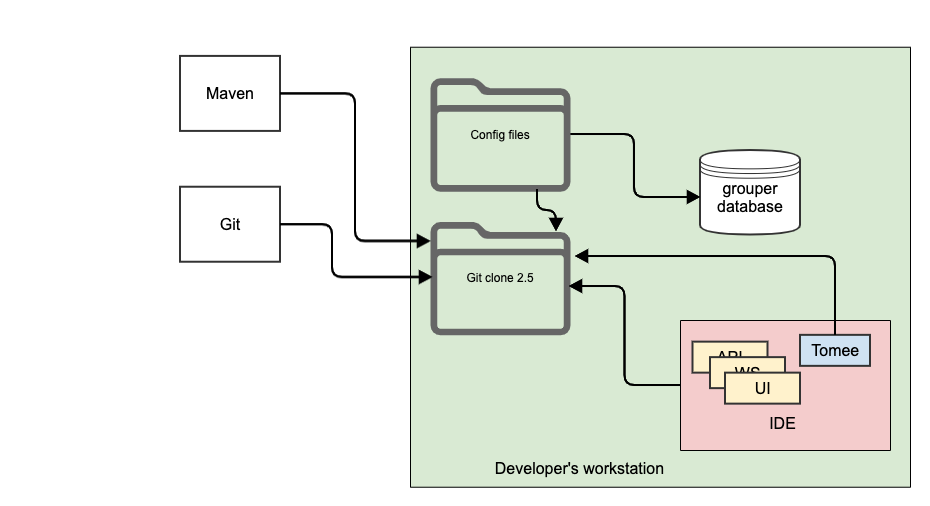
In general the dev env uses:
- Java 8
- IDE (e.g. eclipse)
- Git clone
- Tomee (with tomcat 8.5)
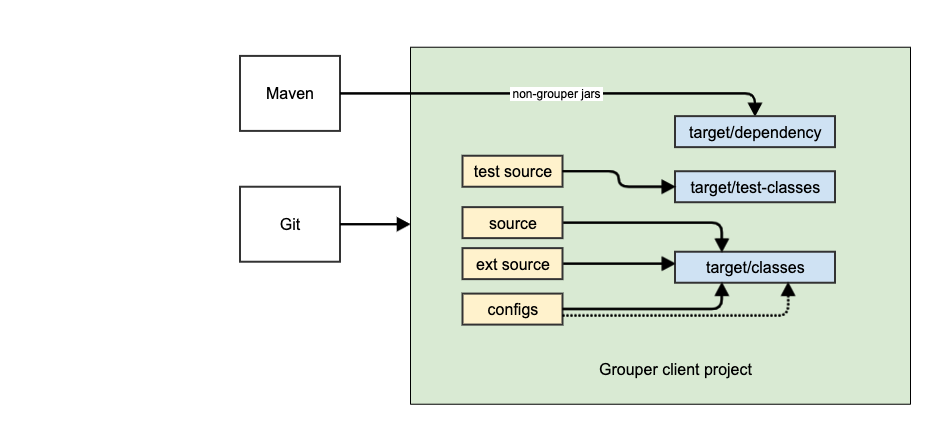
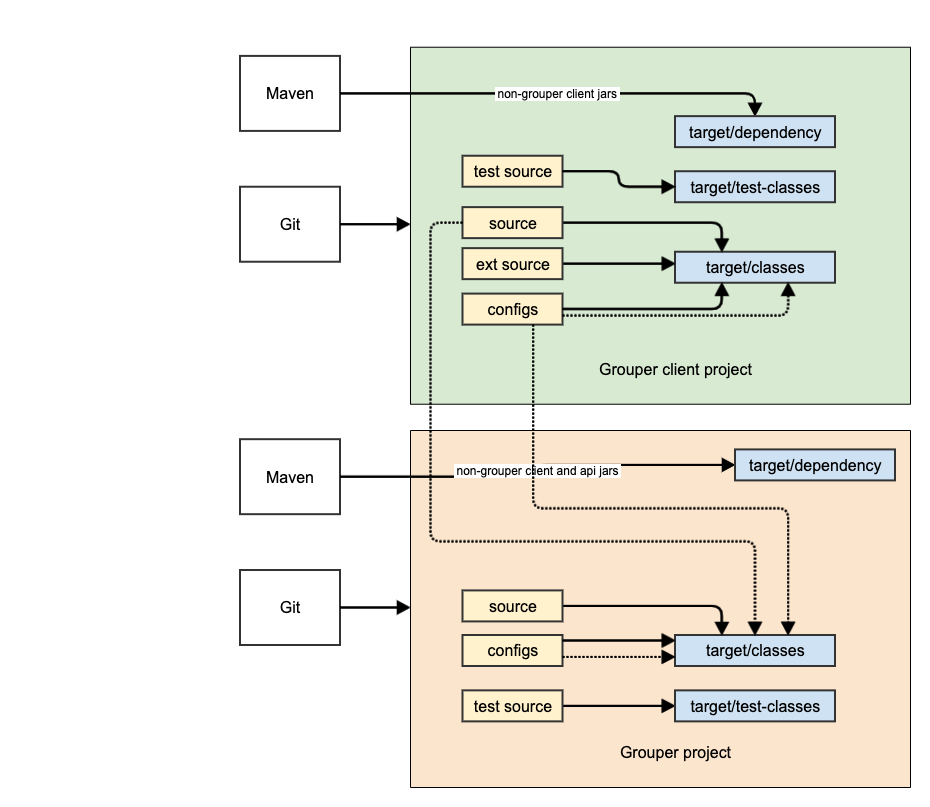
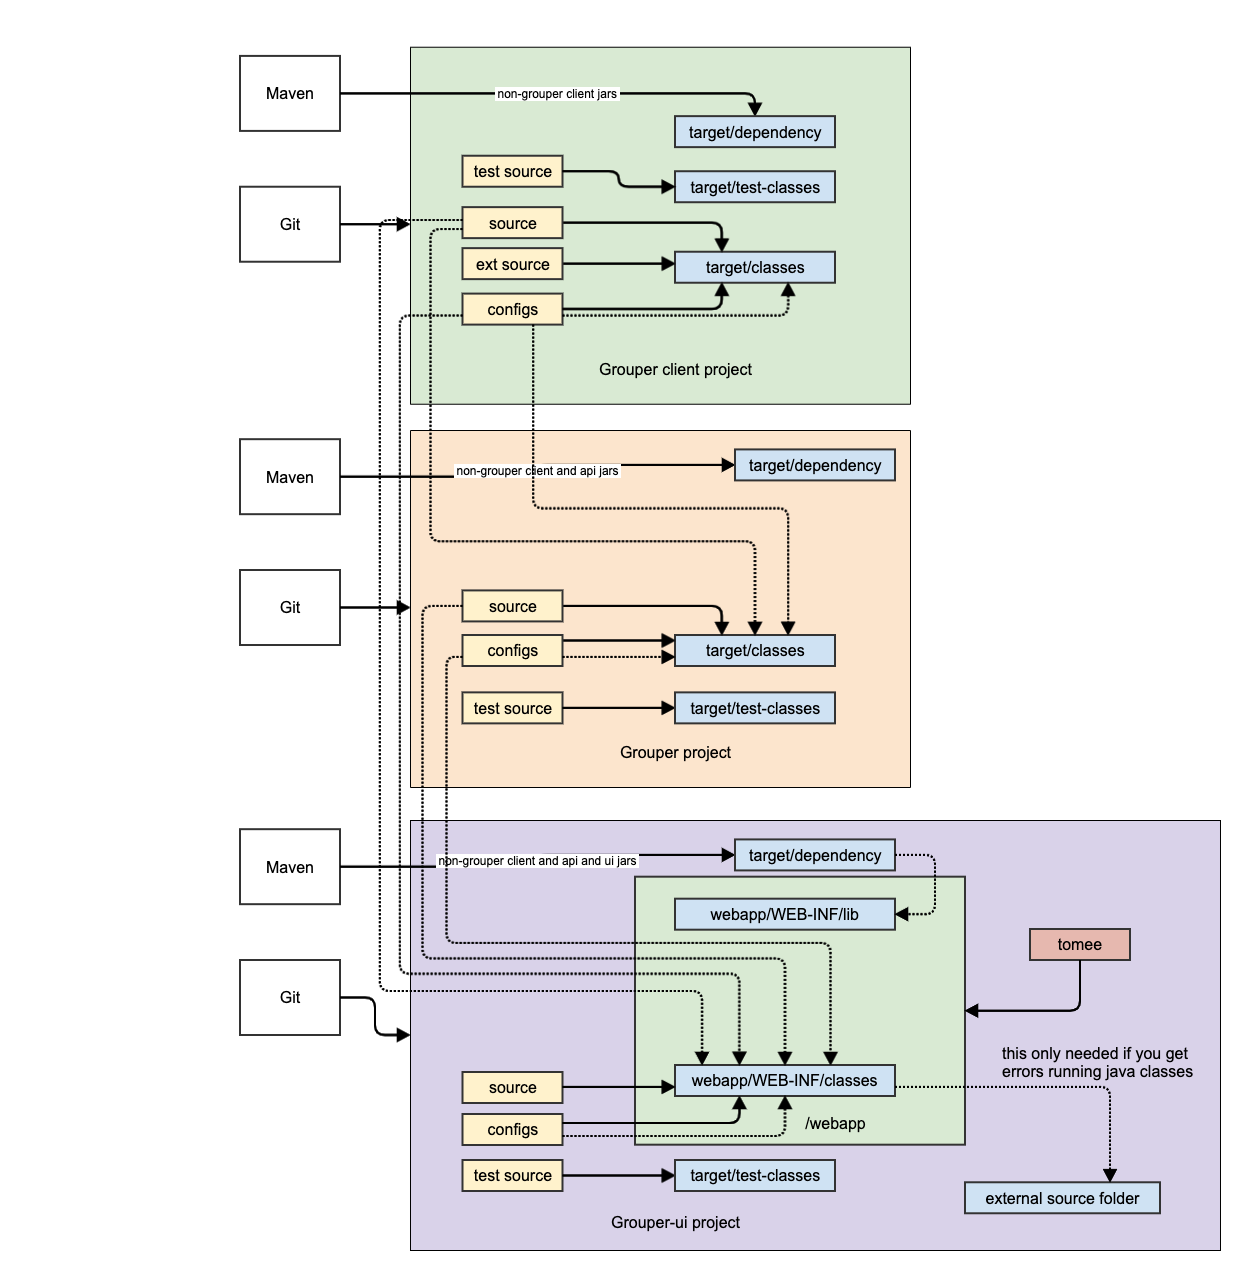
Here are diagrams for the client (base dependency of grouper), api (next dependency), and UI (example of a third and final level dependency)
Grouper client dev env diagram
Grouper API dev env diagram
The API needs the client source and configs as linked source folders (e.g. for eclipse). This makes sure the current version of the configs and classes are in use when running tests or programs or compiling API source.
Non web-app dev env diagram
This an example of a non-web plugin for Grouper. Pretty much all modules for Grouper look like this (except web modules like UI/WS/scim). It generally depends on the API (and transitively client).

Webapp dev env diagram
This is an example of the UI dev env. Note other webapps (WS/scim) will look similar. There is no build script to run Tomee against the webapp, it will just work. When you edit Java classes you might need to restart Tomee (due to hotswap)
The example commands and screenshots are from Windows or MacOS and Eclipse, and may vary slightly for different environments. However, the overall process should be similar on any modern operating system and development tool chain. Developers can use whatever tools that let them work most efficiently.
Prerequisites
Git for source code version control
Install Git
(Mac) Command line installs
$ brew install git
Or Install from package https://git-scm.com/downloads
- Eclipse IDE plugin
- Github Desktop is also handy
Java - Grouper runs on Java
Install OpenJDK 8 exact version (not above or below). Grouper runs on Java.
- Note: do not use Java language features above Java 8 for most of Grouper - grouper, grouper-ui, grouper-ws, etc. The grouperClient code must be compliant with Java 6.
Apache Tomee - Grouper runs in Tomee
- Download and unpack Tomee webprofile 7.0.7. Note: Grouper runs in tomcat 8.5, which is what tomee 7.07 has
Database
- One option: Docker Desktop - to run our development database
- Install Docker Desktop. We’ll use this to run our development database.
- or You could just use hsql
- or Install mysql or postgres or use external database (external will be slow)
Eclipse - Grouper development happens in Eclipse (or your favorite IDE)
- Install Eclipse IDE for Enterprise Java Developers or similar IDE
- Make sure you have the latest eclipse (2020) or upgrade your current eclipse
If you get errors on the client about deprecated libraries, you might need to adjust your compiler errors/warnings

Clone the Grouper Source Repository
Import Projects into Eclipse
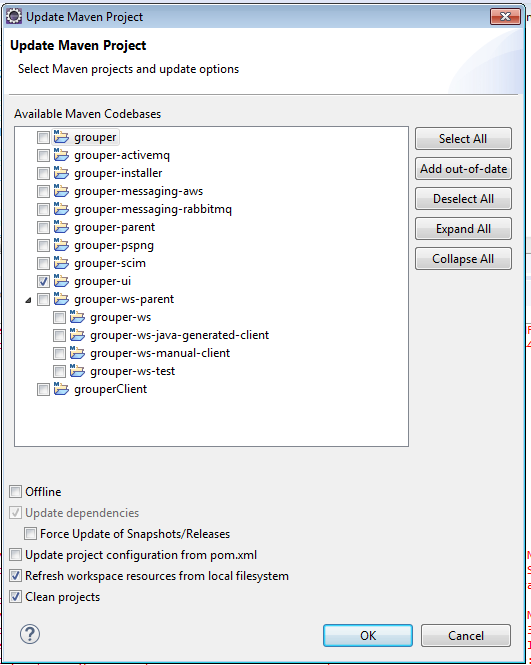
Maven clean on grouper-parent
Run the maven grouper-parent clean and install (you can right click in eclipse on the pom and run as: maven clean, then install). you might need to delete .m2/repository/* if it is corrupt
[INFO] Reactor Summary for Grouper 2.5.0-SNAPSHOT:
[INFO]
[INFO] Grouper ............................................ SUCCESS [  1.632 s]
[INFO] Grouper Client ..................................... SUCCESS [  3.659 s]
[INFO] Grouper API ........................................ SUCCESS [  9.454 s]
[INFO] Grouper SCIM ....................................... SUCCESS [  0.256 s]
[INFO] Grouper UI ......................................... SUCCESS [  2.295 s]
[INFO] Grouper WS Parent .................................. SUCCESS [  0.063 s]
[INFO] Grouper WS ......................................... SUCCESS [  3.129 s]
[INFO] Grouper WS Generated Client ........................ SUCCESS [  5.320 s]
[INFO] Grouper WS Manual Client ........................... SUCCESS [  0.825 s]
[INFO] Grouper WS Test .................................... SUCCESS [  0.098 s]
[INFO] Grouper Installer .................................. SUCCESS [  8.198 s]
[INFO] Grouper AMQ ........................................ SUCCESS [  0.853 s]
[INFO] Grouper Rabbitmq ................................... SUCCESS [  6.950 s]
[INFO] Grouper AWS Messaging .............................. SUCCESS [  9.099 s]
[INFO] Grouper PSP-NG ..................................... SUCCESS [  0.389 s]
[INFO] ------------------------------------------------------------------------
[INFO] BUILD SUCCESS
If there are problems in a project, you might need to right click, and do Maven → Update project
When you do that, the first time, check the box to update project configuration. In all subsequent times, do NOT have the box checked to update project configuration from pom, or your settings will get undone
All the projects should now be open and compiled.

Link conf to grouper client project
This is one of the main tricks. In my eclipse, the "conf" dir is excluded due to the pom.xml in maven
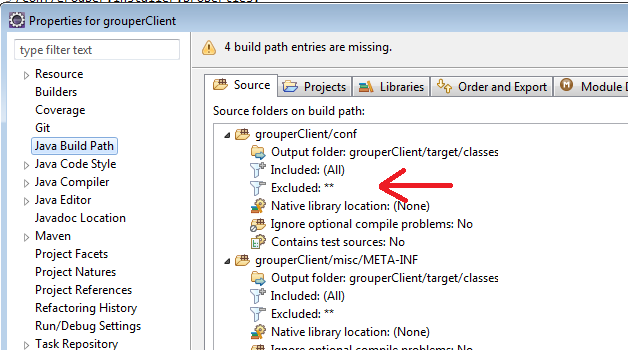
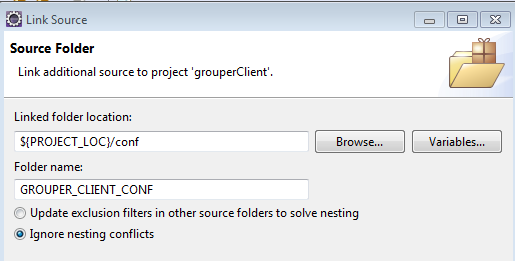
Link the conf dir (even though its already a source folder) in java build path
- ${PROJECT_LOC}/conf → GROUPER_CLIENT_CONF
Link source and conf to grouper project
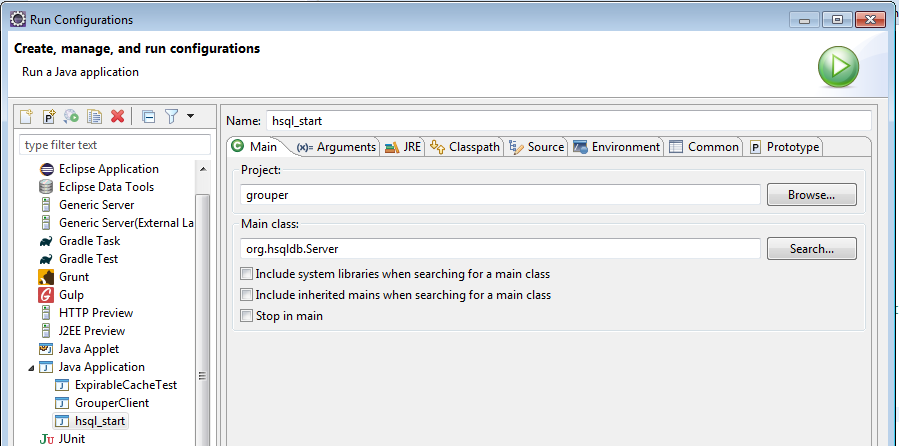
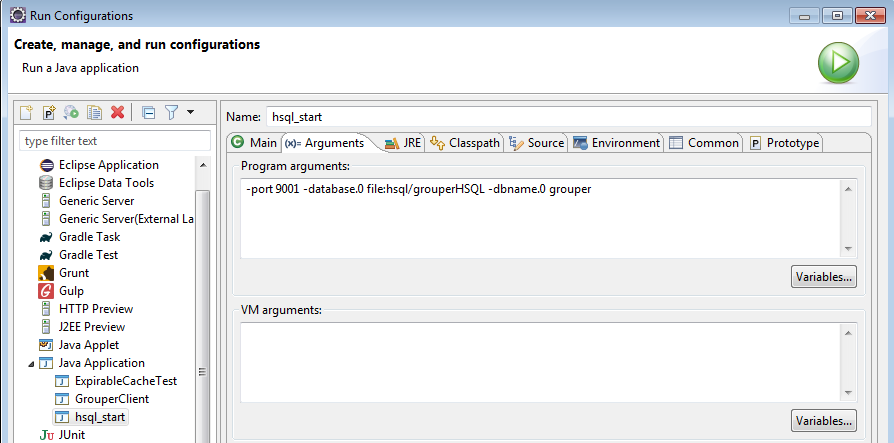
Start HSQL (or whatever database)
Make a java application:
- Project: grouper
- Class:
- Arguments: -port 9001 -database.0 file:hsql/grouperHSQL -dbname.0 grouper
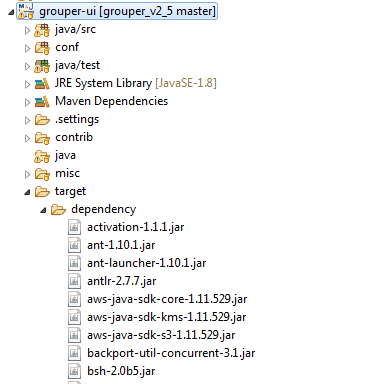
Get grouper UI Jars
First off, we need all the jars. You need to do this in the future if you have any class not found exceptions or weird errors, goals: dependency:copy-dependencies

All jars are not in target/dependency
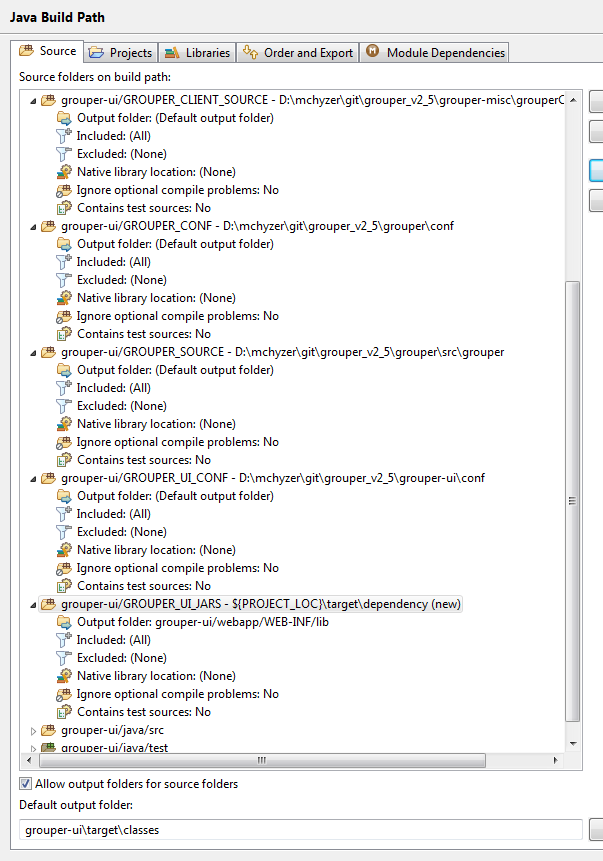
Link source and conf to grouper-ui project
We want to be able to run and debug the Grouper UI from the grouper-ui/webapp folder, so that we can work on webapp artifacts (JSPs, etc), and at the same time update Java code in the grouper project and other code locations. To do this we will update the Java Build Path output folder so that compiled classes and other artifacts go to the right directories under grouper-ui/webapp. We will also add some dependent source and library folders to the grouper-ui Java Build Path.
- grouper-ui -> File -> Properties -> Java Build Path -> Source tab
- Set ‘Default output folder:’ to: grouper-ui/webapp/WEB-INF/classes (you may have to create this directory)
- Add dependent source and configuration folders to the grouper-ui Java Build Path
- Link source: ${GIT_ROOT}/grouper-misc/grouperClient/src/java → GROUPER_CLIENT_SOURCE
- Link source: ${GIT_ROOT}/grouper-misc/grouperClient/conf → GROUPER_CLIENT_CONF
- Link source: ${PROJECT_LOC}/conf → GROUPER_UI_CONF
- Link source: ${GIT_ROOT}/grouper/conf → GROUPER_CONF
- Link source: ${GIT_ROOT}/grouper/src/grouper → GROUPER_SOURCE
- Link source: ${PROJECT_LOC}/target/dependency → GROUPER_UI_JARS
- Output folder for jars is: webapp/WEB-INF/lib (create the folder)
- Make sure all folders except ‘grouper-ui/java/test’ are using the default output folder
Make sure grouper-ui/conf has ‘Excluded:’ set to (None)(Note, this gets changed back for Chris, so ignore it)- Remove srcPoc and misc source folders (these are not needed)
The grouper-ui Java Build Path should now look something like this:
Add Grouper project as build path project
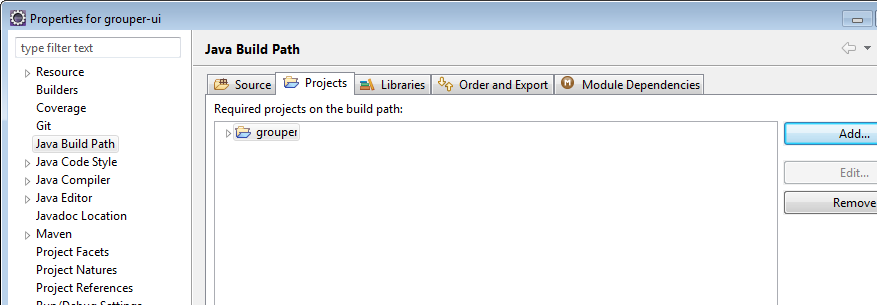
In Grouper project, export all the maven dependencies in build path

Configure Eclipse Code Formatter
- Eclipse -> Preferences -> Java Code Style -> Formatter
- Import… (navigate and select grouper/misc/eclipse/fastFormat.xml)
- Apply and close
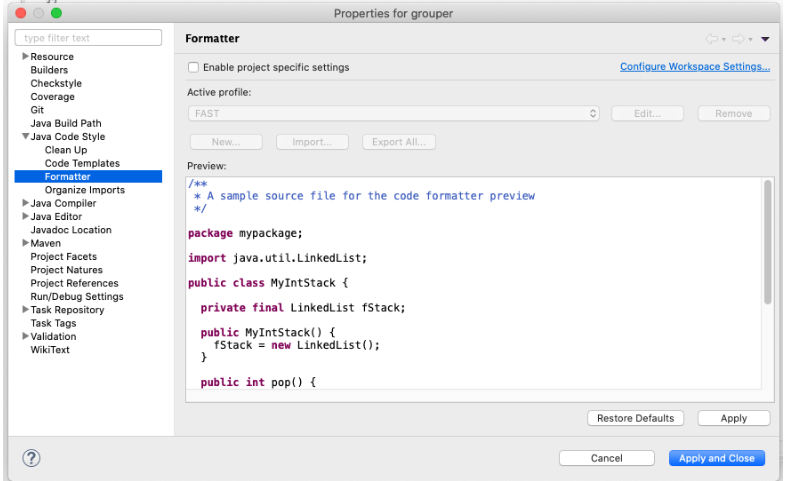
4. Look in Eclipse config and change all tabs to 2 spaces for indenting (search for "tab")
5. Disable folding
6. Disable spell check
7. Look in eclipse config and ignore whitespace changes
8. Settings → General → Workspace → New text file line endings → Unix
Development Database
Multiple databases are supported including Oracle, mySQL, and PostgreSQL. We’ll use PostgreSQL for this how-to. The steps for other databases would be similar.
Start the development database
Running Postgres in Docker on a Windows Host
Postgres' docker image runs the database as an unprivileged user postgres. The container's startup script attempts to chown /var/lib/postgresql/data folder to this user. In Docker Desktop for Windows, this causes the script to throw an error and exit. Bind volumes cannot easily have their ownership changed from within the container running on a Windows host. The workaround for this is creating a named volume instead.
We will run postgres with a mounted external volume to preserve data between docker container restarts.
- Create a named volume 'docker create volume grouper-postgres'
- Run ‘docker run --name grouperdb -e POSTGRES_PASSWORD=grouper -e POSTGRES_USER=grouper -d -p 5432:5432 -v grouper-postgres:/var/lib/postgresql/data postgres’
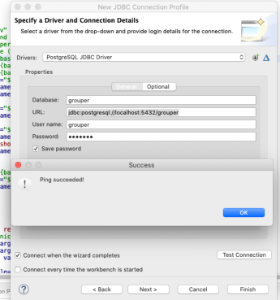
Connect to development database in Eclipse
Note, this is one way to do it. Using any other database UI browser works too. e.g. Squirrel SQL client works with all DBs
- Window -> Perspective -> Open Perspective -> Other -> Database Development -> Open
- Right click ‘Database Connections’ and create PostgreSQL connection profile
Add the postgess JDBC driver found in under ../grouper/grouper-ui/target/dependency
Enter the connection details and then click Test Connection
Configure minimum properties files for development
Create and configure the grouper-hibernate.properties for postgres (for example)
- cd grouper/conf
- cp .../misc/grouper.hibernate.example.properties grouper.hibernate.properties
- edit grouper.hibernate.properties to look like the following:
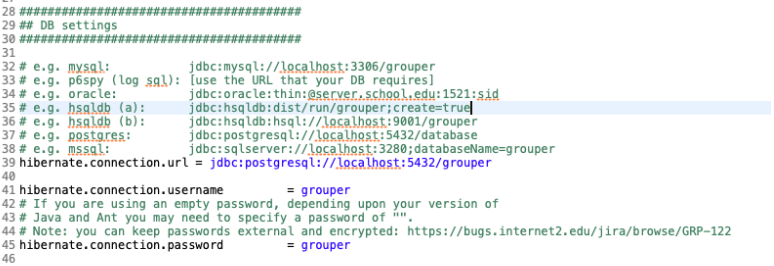
Example for HSQL database: make a file grouper/conf/grouper.hibernate.properties:
########################################
## DB settings
########################################

# e.g. mysql:           jdbc:mysql://localhost:3306/grouper?useSSL=false
# e.g. p6spy (log sql): [use the URL that your DB requires]
# e.g. oracle:          jdbc:oracle:thin:@server.school.edu:1521:sid
# e.g. hsqldb (a):      jdbc:hsqldb:dist/run/grouper;create=true
# e.g. hsqldb (b):      jdbc:hsqldb:hsql://localhost:9001/grouper
# e.g. postgres:        jdbc:postgresql://localhost:5432/database
# e.g. mssql:           jdbc:sqlserver://localhost:3280;databaseName=grouper
hibernate.connection.url = jdbc:hsqldb:hsql://localhost:9001/grouper

hibernate.connection.username         = sa
# If you are using an empty password, depending upon your version of
# Java and Ant you may need to specify a password of "".
# Note: you can keep passwords external and encrypted: https://bugs.internet2.edu/jira/browse/GRP-122
hibernate.connection.password         =
Create and configure morphString.properties
- cd grouper/conf
- cp .../misc/morphString.example.properties morphString.properties
- Edit .../grouper/grouper/conf/morphString.properties
- encrypt.key = not_a_random_key
- Make a file grouper/conf/morphString.properties (make up an encrypt.key or generate alphanumeric from password generator)
########################################
## Encryption configuration
########################################

# Put a random alphanumeric string (Case sensitive) for the password encryption.  e.g. fh43IRJ4Nf5jn4Qp9k2
# or put a filename where the random alphanumeric string is.  e.g. c:/whatever/key.txt
# use encrypt.key.elConfig instead if the config has an expression language scriptlet
encrypt.key = abcndme45jg32fj32JNdQ23
- Copy grouper/conf/log4j.example.properties to log4j.properties
Make a grouper/conf/subject.properties
########################################

# enter the location of the sources.xml.  Must start with classpath: or file:
# blank means dont use sources.xml, use subject.properties
# default is: classpath:sources.xml
# e.g. file:/dir1/dir2/sources.xml
subject.sources.xml.location =


#########################################
## Configuration for source id: jdbc
## Source configName: jdbc
#########################################
subjectApi.source.jdbc.id = jdbc

# this is a friendly name for the source
subjectApi.source.jdbc.name = Example JDBC Source Adapter

# type is not used all that much.  Can have multiple types, comma separate.  Can be person, group, application
subjectApi.source.jdbc.types = person

# the adapter class implements the interface: edu.internet2.middleware.subject.Source
# adapter class must extend: edu.internet2.middleware.subject.provider.BaseSourceAdapter
# edu.internet2.middleware.grouper.subj.GrouperJdbcSourceAdapter2  :  if doing JDBC this should be used if possible.  All subject data in one table/view.
# edu.internet2.middleware.grouper.subj.GrouperJdbcSourceAdapter   :  oldest JDBC source.  Put freeform queries in here
# edu.internet2.middleware.grouper.subj.GrouperJndiSourceAdapter   :  used for LDAP
subjectApi.source.jdbc.adapterClass = edu.internet2.middleware.grouper.subj.GrouperJdbcSourceAdapter

subjectApi.source.jdbc.param.jdbcConnectionProvider.value = edu.internet2.middleware.grouper.subj.GrouperJdbcConnectionProvider

subjectApi.source.jdbc.param.emailAttributeName.value = email

# maximum number of results from a search, generally no need to get more than 1000
subjectApi.source.jdbc.param.maxResults.value = 1000

subjectApi.source.jdbc.param.maxPageSize.value = 100

# ldap attribute which is the subject id.  e.g. exampleEduRegID   Each subject has one and only one subject id.  Generally it is opaque and permanent.
subjectApi.source.jdbc.param.SubjectID_AttributeType.value = id

# attribute which is the subject name
subjectApi.source.jdbc.param.Name_AttributeType.value = name

# attribute which is the subject description
subjectApi.source.jdbc.param.Description_AttributeType.value = description

# This virtual attribute index 0 is accessible via: subject.getAttributeValue("searchAttribute0");
subjectApi.source.jdbc.param.subjectVirtualAttribute_0_searchAttribute0.value = ${subject.name},${subjectUtils.defaultIfBlank(subject.getAttributeValue('LFNAME'), "")},${subjectUtils.defaultIfBlank(subject.getAttributeValue('LOGINID'), "")},${subjectUtils.defaultIfBlank(subject.description, "")},${subjectUtils.defaultIfBlank(subject.getAttributeValue('EMAIL'), "")}

# the 1st sort attribute for lists on screen that are derived from member table (e.g. search for member in group)
# you can have up to 5 sort attributes
subjectApi.source.jdbc.param.sortAttribute0.value = LFNAME

# the 2nd sort attribute for lists on screen that are derived from member table (e.g. search for member in group)
# you can have up to 5 sort attributes
subjectApi.source.jdbc.param.sortAttribute1.value = LOGINID

# the 1st search attribute for lists on screen that are derived from member table (e.g. search for member in group)
# you can have up to 5 search attributes
subjectApi.source.jdbc.param.searchAttribute0.value = searchAttribute0

subjectApi.source.jdbc.param.useInClauseForIdAndIdentifier.value = true

subjectApi.source.jdbc.param.identifierAttributes.value = LOGINID

# subject identifier to store in grouper's member table.  this is used to increase speed of loader and perhaps for provisioning
# you can have up to max 1 subject identifier
subjectApi.source.jdbc.param.subjectIdentifierAttribute0.value = LOGINID

#searchSubject: find a subject by ID.  ID is generally an opaque and permanent identifier, e.g. 12345678.
#  Each subject has one and only on ID.  Returns one result when searching for one ID.

# sql is the sql to search for the subject by id should use an {inclause}
subjectApi.source.jdbc.search.searchSubject.param.sql.value = select    s.subjectid as id, s.name as name,    (select sa2.value from subjectattribute sa2 where name='name' and sa2.SUBJECTID = s.subjectid) as lfname,    (select sa3.value from subjectattribute sa3 where name='loginid' and sa3.SUBJECTID = s.subjectid) as loginid,    (select sa4.value from subjectattribute sa4 where name='description' and sa4.SUBJECTID = s.subjectid) as description,    (select sa5.value from subjectattribute sa5 where name='email' and sa5.SUBJECTID = s.subjectid) as email from    subject s where    {inclause}

# inclause allows searching by subject for multiple ids or identifiers in one query, must have {inclause} in the sql query,
#    this will be subsituted to in clause with the following.  Should use a question mark ? for bind variable
subjectApi.source.jdbc.search.searchSubject.param.inclause.value = s.subjectid = ?

#searchSubjectByIdentifier: find a subject by identifier.  Identifier is anything that uniquely
#  identifies the user, e.g. jsmith or jsmith@institution.edu.
#  Subjects can have multiple identifiers.  Note: it is nice to have if identifiers are unique
#  even across sources.  Returns one result when searching for one identifier.

# sql is the sql to search for the subject by identifier should use an {inclause}
subjectApi.source.jdbc.search.searchSubjectByIdentifier.param.sql.value = select    s.subjectid as id, s.name as name,    (select sa2.value from subjectattribute sa2 where name='name' and sa2.SUBJECTID = s.subjectid) as lfname,    (select sa3.value from subjectattribute sa3 where name='loginid' and sa3.SUBJECTID = s.subjectid) as loginid,    (select sa4.value from subjectattribute sa4 where name='description' and sa4.SUBJECTID = s.subjectid) as description,    (select sa5.value from subjectattribute sa5 where name='email' and sa5.SUBJECTID = s.subjectid) as email from    subject s, subjectattribute a where    a.name='loginid' and s.subjectid = a.subjectid and {inclause}

# inclause allows searching by subject for multiple ids or identifiers in one query, must have {inclause} in the sql query,
#    this will be subsituted to in clause with the following.  Should use a question mark ? for bind variable
subjectApi.source.jdbc.search.searchSubjectByIdentifier.param.inclause.value = a.value = ?

#   search: find subjects by free form search.  Returns multiple results.

# sql is the sql to search for the subject free-form search.  user question marks for bind variables
subjectApi.source.jdbc.search.search.param.sql.value = select    s.subjectid as id, s.name as name,    (select sa2.value from subjectattribute sa2 where name='name' and sa2.SUBJECTID = s.subjectid) as lfname,    (select sa3.value from subjectattribute sa3 where name='loginid' and sa3.SUBJECTID = s.subjectid) as loginid,    (select sa4.value from subjectattribute sa4 where name='description' and sa4.SUBJECTID = s.subjectid) as description,    (select sa5.value from subjectattribute sa5 where name='email' and sa5.SUBJECTID = s.subjectid) as email from    subject s where    s.subjectid in (       select subjectid from subject where lower(name) like concat('%',concat(?,'%')) union       select subjectid from subjectattribute where searchvalue like concat('%',concat(?,'%'))    )

# internal attributes are used by grouper only not exposed to code that uses subjects.  comma separated
subjectApi.source.jdbc.internalAttributes = searchAttribute0
groovy:000> :gshFileLoad 'D:\mchyzer\git\grouper_v2_5\grouper\temp\addUser.gsh'
===> 8d2b86db8f2541f181d862af1aa3c6c3,'GrouperSystem','application'
===> edu.internet2.middleware.grouper.authentication.GrouperPasswordSave@738a39cc
===> edu.internet2.middleware.grouper.authentication.GrouperPasswordSave@738a39cc
===> edu.internet2.middleware.grouper.authentication.GrouperPasswordSave@738a39cc
===> null
groovy:000> :exit
Run GrouperShell, and init db
FYI: how to run Java classes on the command line
Bootstrap the Grouper Database
For development purposes, we’ll bootstrap the Grouper database, add sample subjects, and reset the database using a few Java classes.
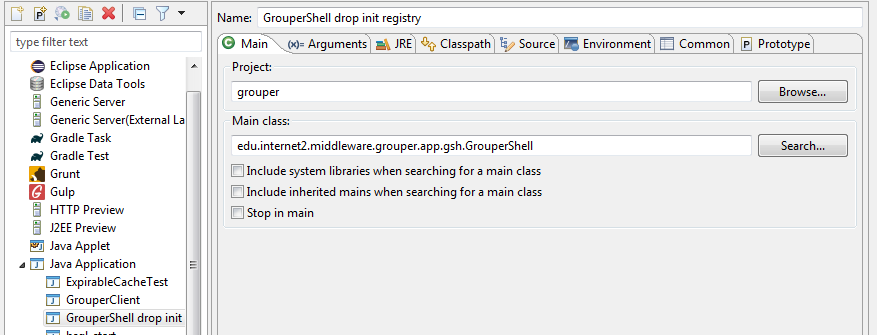
Run GrouperShell from Eclipse to initialize the Grouper database:
- Right click GrouperShell in the Grouper project explorer
- Select ‘Run as’ and then ‘Run Configurations…’
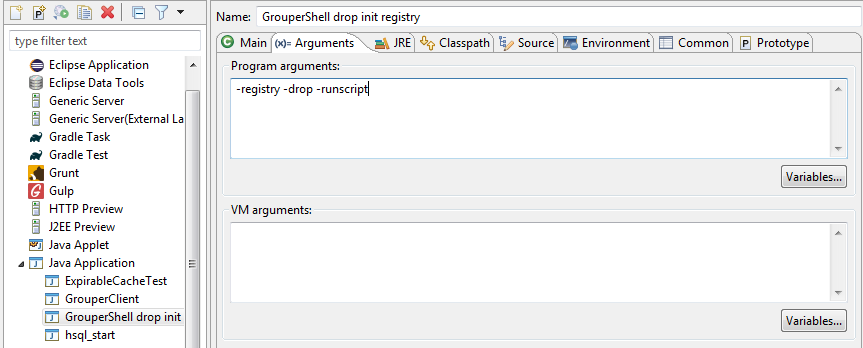
- Name: GrouperShell -registry -runscript -noprompt
- (x) = Arguments tab
- Program arguments: -registry -runscript -noprompt
- Classpath tab
- Highlight User Entries and click ‘Advanced…’
- Add the ‘conf’ folder to the classpath for the properties files
- Click ‘Apply’
- Click ‘Run’
Run GrouperShell from Eclipse to check the Grouper database:
- Right click GrouperShell in grouper project explorer
- Select ‘Run as’ and then ‘Run Configurations…’
- Name: GrouperShell -registry -check -noprompt
- (x) = Arguments tab
- -registry -check -noprompt
- Program arguments:
- Classpath tab
- Highlight User Entries and click ‘Advanced…’
- Add the ‘conf’ folder to the classpath
- Click ‘Apply’
- Click ‘Run’
Run RegistryReset with ‘addSubjects’ as an argument to add sample subjects:
- Right click RegistryReset in grouper project explorer
- Select ‘Run as’ and then ‘Run Configurations…’
- Name: RegistryReset addSubjects
- (x) = Arguments tab
- Program arguments:
- addSubjects
- Classpath tab
- Highlight User Entries and click ‘Advanced…’
- Add the ‘conf’ folder to the classpath
- Click ‘Apply’
- Click ‘Run’
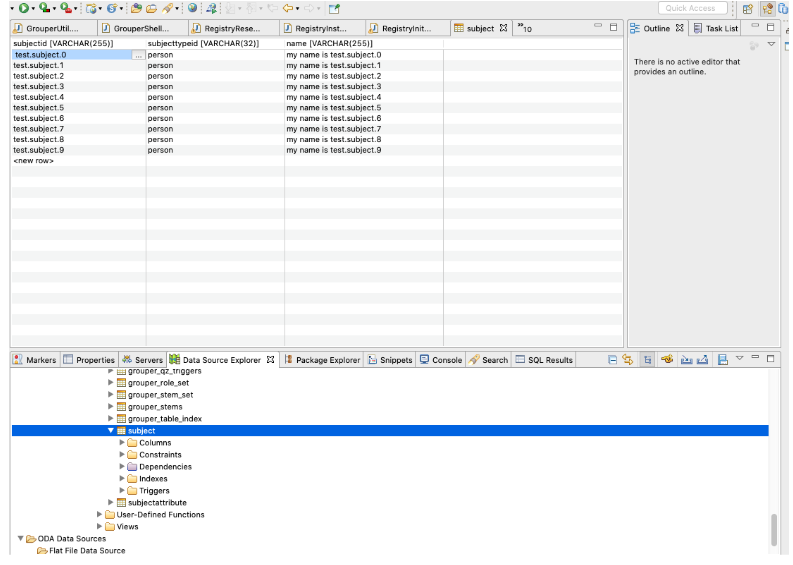
Query the subjects table from the Eclipse Data Source Explorer to see the added subjects:
Add a GrouperSystem basic auth password
Run grouper-ui in Eclipse with Tomcat
Now that we have a Grouper database and some test subjects, the next step is to add the grouper-ui/webapp directory to the Eclipse Tomcat launcher so we can run and debug the grouper-ui.
Replace the tomee/lib/hsql jar with the one from grouper-ui/target/dependency
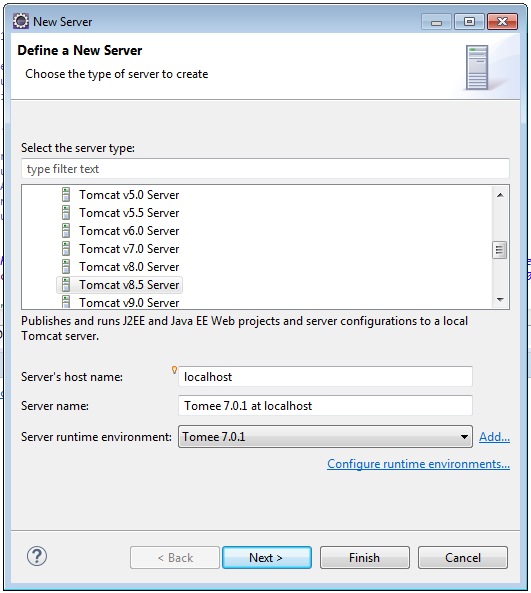
Add Tomcat server to Eclipse:
- Eclipse -> J2EE Perspective -> Servers Tab
- Click “No servers are available. Click this link to create a new server…”
- Select 'Tomcat v8.5'
- Select your tomee installation directory
- Select your JRE
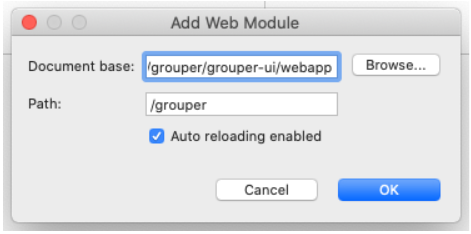
Add grouper-ui web module to Tomcat Server
- Double click on Tomcat v8.5 at localhost [Stopped, Republish] to access configuration panel
- Click on ‘Modules’ tab, click ‘Add External Web Module…”
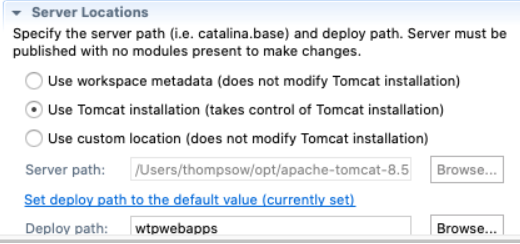
Configure Server Location
- Select ‘Use Tomcat installation (takes control Tomcat installation)
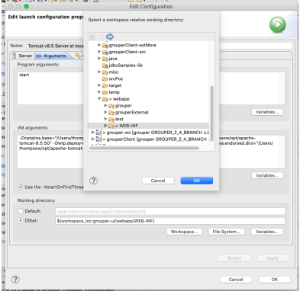
Configure Tomcat Server Working Directory to direct Grouper logs
- Servers tab -> Overview -> click on “Open launch configuration”
- (x)= Arguments tab
- Working directory:
- Select grouper-ui/webapp/WEB-INF
- Choose Other
- Click Workspace…
Grouper logs will now show up under ../grouper-ui/webapp/WEB-INF/logs
Create Grouper Users in tomcat-user.xml
Add GrouperSystem and test.subject.0 through 9 to tomcat-user.xml
- Add the following to ../apache-tomee-webprofile-7.0.7/conf/tomcat-users.xml
Run Grouper from Eclipse
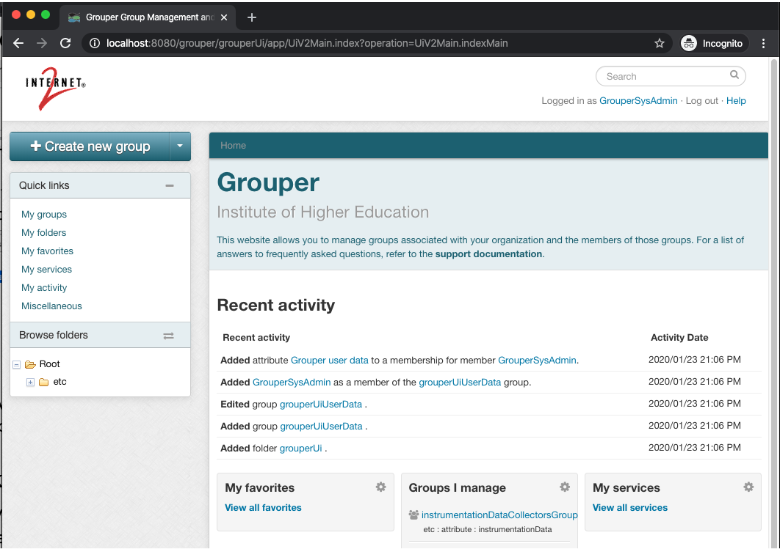
Start Tomcat from Eclipse by selecting the server under the Servers tab and clicking the green ‘Run’ button.
Grouper UI should be available at http://localhost:8080/grouper. You should be able to log in with GrouperSystem or any of the test subjects and no password.
Debug Grouper from Eclipse
- Set a breakpoint in UiV2Main.java line #114
- Start the server in debug mode
- Login and try to search in the Grouper UI
- This should hit the breakpoint in Eclipse and allow you step through the code.
Congrats! You now have a working Grouper development environment. Now go check out Grouper developers coding standards and then pick up some JIRAs!