| Table of Contents |
|---|
Overview
The Shibboleth IdP UI provides capabilities for the creation of metadata sources, metadata providers, and filters metadata.
Dashboards
The Shibboleth IdP UI has four dashboard functions:
- Metadata Source
- Metadata Provider
- Admin
- Action Required
A Shibboleth IdP UI Administrator (Administrator) has the ability to view all of these. In addition, the Administrator is able to view and modify all metadata sources, metadata providers, and administrative functions including the Admin and Action Required dashboards.
A Shibboleth IdP UI Delegated Administrator (User) only has the ability to maintain Metadata Source metadata and can only view the Metadata Source dashboard. The User's Metadata Source Dashboard will only display metadata sources created by that User.
Metadata Source
The Metadata Source dashboard displays the list of metadata sources that have been created using the Shibboleth IdP UI application. The process to update a metadata source starts by clicking the title. If the metadata source information has been saved to the database, the metadata configuration page will be displayed. If the metadata source was created using the wizard but the entry of information was not complete, the wizard will load and display the page where entry was stopped.

Metadata Provider
The Metadata Provider dashboard displays the list of metadata providers that have been created using the Shibboleth IdP UI application. There are four types of metadata providers - FileBackedHTTPMetadataProvider, FileSystemMetadataProvider, LocalDynamicMetadataProvider and DynamicHTTPMetadataProvider.

Admin
The Admin Dashboard enables an Administrator to assign roles to individuals allowed to use the Shibboleth IdP UI application. The available roles are Administrator or User.

Action Required
The Action Required Dashboard provides the Administrator with two types of notifications:
- Enable Metadata Sources
- User Access Requests
Enable Metadata Sources displays requests when a user creates a new metadata source. User Access Requests prompts administrators to assign a role for a new User.

Add Metadata Source
To add a metadata source, click the Add New button at the top of the page, and choose the Metadata Source option from the drop down.

Select Add Option
Three options are provided to begin the process for adding a new metadata source when the page is displayed as shown below.

- Create (default option) - this option requires you to enter information manually by following the Create Metadata Source wizard and entering all pertinent information for the metadata source. Following the last page of the wizard (attribute release) the metadata configuration page will be displayed.
- Upload/URL - this option provides the ability to bring in existing metadata source information by uploading the information from either a file or a URL. Once the information has been saved, the metadata configuration page will be displayed to allow for modifications to be made to the information uploaded.
- Copy - this option provides the ability to bring in existing metadata source information by copying a metadata source that already exists in the Shibboleth IdP UI application. Once the information has been saved, the metadata configuration page will be displayed to allow for modifications to be made to the information uploaded.
On each page, fields that require information to be entered are denoted by a '*' at the end of the description for the field.
Examples of the pages for the different options are displayed below.
Create
Enter the Service Provider Name and Entity ID then click the Organization Information button to continue through the wizard.

The wizard guides you through the following pages to capture the metadata source information:
- Organization information
- MDUI information
- SP SSO descriptor information
- Logout endpoints
- Security information
- Assertion consumer services
- Relying party overrides
- Attribute release
Navigation through the wizard is controlled by either moving to the previous page by clicking the Back button or moving to the next page by clicking the Next button. This add process can be stopped by clicking the Dashboard link at the top of this page. A pop-up will be displayed asking if you want to Finish Later or Cancel. By selecting Finish Later, the information entered will be saved locally and the Metadata Source dashboard will be displayed. If you select Cancel on the pop-up, the current page will be re-displayed.
Examples of each page are shown below.
Organization Information

MDUI Information

SP SSO Descriptor Information

Logout Endpoints

Security Information

Assertion Consumer Services

Relying Party Overrides

Attribute Release

Upload/URL
Enter the Service Provider Name and either a metadata file or metadata URL the click the Save button. All data will be retrieved from the metadata file. Updates to the data retrieved will not be available to until the Metadata Source Add Configuration page is displayed.

Copy
Select the entity id to copy, enter Service Provider Name and Entity ID then click the Next button. All data will be copied from the entity id selected. Updates to the data retrieved will not be available to until the Metadata Source Add Configuration page is displayed.

Metadata Source Add Configuration Page
The metadata source configuration add page displays when you have finished adding a metadata source. This page displays all of the values for the metadata source on one page. You can edit metadata source configuration details by clicking the edit link for a section. If no edits are needed, you can save the information for the metadata source in the database by clicking the Save button. An Administrator also has the ability to enable the metadata source for use in an IdP. If the metadata source is added by a User, a request will be sent for an Administrator to enable the metadata source.

Update Metadata Source
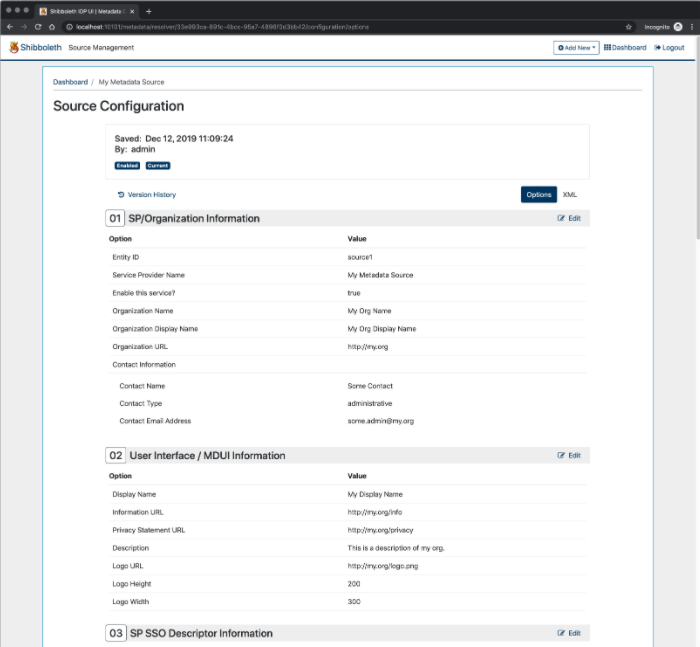
Source Configuration
When you click on a metadata source in the Metadata Sources dashboard, the Source Configuration page will be displayed. This page shows the following information for the metadata source:
- Date saved
- Saved by
- Enabled/Not Enabled
- Whether it is the current production version
- All configuration information saved separated by section
Click the following links to initiate actions from this page:
- Version History - Display of version history for the metadata source
- XML - View the XML Configuration for the metadata source
- Edit - Edit the metadata source. This option is only available if you are viewing the current version of the metadata source.
Version History
The Version History page displays all of the versions that were saved for the metadata source. The following actions can be initiated from this page:
- Compare Selection - Click two or more check boxes to the left of the save date and click the Compare Selected button. The Compare Source Configuration Page will be displayed.
- Display/edit version - Click the version to display the Source Configuration page.
- Restore - Click the Restore link next to a version to create a new version for the metadata source. This will contain the information that was saved for the version selected.

Compare Selection
When two or more versions are selected to compare, the Compare Source Configuration will be displayed. This display shows all data fields for the metadata source and highlights the fields that are different between the versions. An additional option is available by toggling the View Only Changes field. The page displayed will display only the fields that have changed.
Full Data Display

Changes Only

Restore
When you click the link to restore a version, the Restore Version page will be displayed. If you click the Cancel button, the Version History page will be re-displayed with no changes. If you click the Restore button, a new version will be created and the configuration page will be displayed as defined above. You can make modifications to the new version of the metadata source and save it.

XML Configuration
This page displays the XML version of the metadata for the metadata source.

Edit
When you click the Edit link in the Source Configuration page, the section you selected to edit is displayed on the page. The link in the left navigation is highlighted indicating the section displayed. The following functions can be performed on this page:
- Modifications can be made to the data on the page
- Data can be saved by clicking the Save button. All modifications for the metadata source will be saved and the Source Configuration page will be displayed. Note: Multiple sections can be modified prior to selecting Save and the modifications for all sections will be saved.
- Clicking the Cancel button will cause the Source Configuration to be displayed and all modifications made since the last Save will be ignored.
- Clicking the link for another section in the left navigation will initiate the display of a new page containing the data for that section.

Add Metadata Provider
To add a metadata provider, click the Add New button at the top of the page, and choose the Metadata Provider option from the button menu. After you choose the Metadata Provider option, you will be prompted to select the metadata provider type.This will start the add process for the metadata provider. Enter a metadata provider name and select one of the four metadata provider types:
- FileBackedHTTPMetadataProvider
- FileSystemMetadataProvider
- LocalDynamicMetadataProvider
- DynamicHTTPMetadataProvider
A wizard will guide you through the steps to provide the information required for each metadata provider type.
On each page of the wizard, fields that require information to be entered are denoted by a '*' at the end of the description for the field. Following the last page of the wizard (attribute release) the metadata configuration page will be displayed.

Add New Metadata Provider
Navigation through the wizard is controlled by either moving to be previous page by clicking the Back button or moving to the next page by clicking the Next button. The add metadata provider process can be stopped by clicking the Dashboard link at the top of this page. A pop-up will be displayed asking if you want to Finish Later or Cancel. If you select Finish Later the information entered will be saved locally and the Metadata Provider dashboard will be displayed. If you select Cancel the current page will be re-displayed.
FileBackedHTTPMetadataProvider Wizard
The FileBackedHTTPMetadataProvider wizard displays the following pages to capture the metadata provider information:
- Common Attributes
- Reloading Attributes
- Metadata Filter Plugins
Examples of each page are shown below.
Common Attributes

Reloading Attributes

Metadata Filter Plugins

FileSystemMetadataProvider Wizard
The FileSystemMetadataProvider wizard displays the following pages to capture the metadata provider information:
- Common Attributes
- Dynamic Attributes
Examples of each page are shown below.
Common Attributes

Dynamic Attributes

LocalDynamicMetadataProvider Wizard
The LocalDynamicMetadataProvider wizard displays the following pages to capture the metadata provider information:
- Common Attributes
- Dynamic Attributes
Examples of each page are shown below.
Common Attributes

Dynamic Attributes

DynamicHTTPMetadataProvider Wizard
The DynamicHTTPMetadataProvider wizard displays the following pages to capture the metadata provider information:
- Common Attributes
- Dynamic Attributes
- Metadata Filter Plugins
Examples of each page are shown below.
Common Attributes

Dynamic Attributes

Metadata Filter Plugins

Metadata Provider Add Configuration Page
The metadata provider configuration page that displays when you have finished adding a metadata provider allows you to view all of the values for the metadata provider on one page. The information displayed on the Add Configuration page will be determined by the metadata provider type for the metadata provider. You can edit metadata provider configuration details by clicking the edit link for a section. Once all information is reviewed/updated, save the information for the metadata provider in the database by clicking the Save button. An Administrator also has the ability to enable the metadata provider for use in an IdP. If the metadata provider is added by a User, a request will be sent for an Administrator to enable the metadata source.
Examples of the add configuration page for each type of metadata provider are shown below.
FileBackedHTTPMetadataProvider

FileSystemMetadataProvider

LocalDynamicMetadataProvider

DynamicHTTPMetadataProvider

Update Metadata Provider
Provider Configuration
When you click a metadata provider in the dashboard, the Provider Configuration page will display with the sections displayed determined by the metadata provider type. This page displays the following common information for the metadata provider:
- Date saved
- Saved by
- Enabled/Not Enabled
- Whether it is the current production version
- All configuration information saved separated by section
The following links can be selected to initiate actions from this page:
- Version History - Display of version history for the metadata provider.
- Edit - Edit the metadata source. This option is only available for the current version.
Note: Version History includes options for Compare Selections, Edit/Display, and Restore metadata providers. The functionality of these options is the same as it is for metadata sources. Please refer to those sections above for more details.
The provider configuration page for each metadata provider type is displayed below.
FileBackedHTTPMetadataProvider


FileSystemMetadataProvider

LocalDynamicHTTPMetadataProvider

DynamicHTTPMetadataProvider

Edit
When you click the Edit link in the Provider Configuration page, the section you selected to edit is displayed on the page. The link in the left navigation is highlighted indicating the section displayed. The following functions can be performed on this page:
- Modifications can be made to the data on the page
- Data can be saved by clicking the Save button. All modifications for the metadata source will be saved and the Source Configuration page will be displayed. Note: Multiple sections can be modified prior to selecting Save and the modifications for all sections will be saved.
- Clicking the Cancel button will cause the Source Configuration to be displayed and all modifications made since the last Save will be ignored.
- Clicking the link for another section in the left navigation will initiate the display of a new page containing the data for that section.

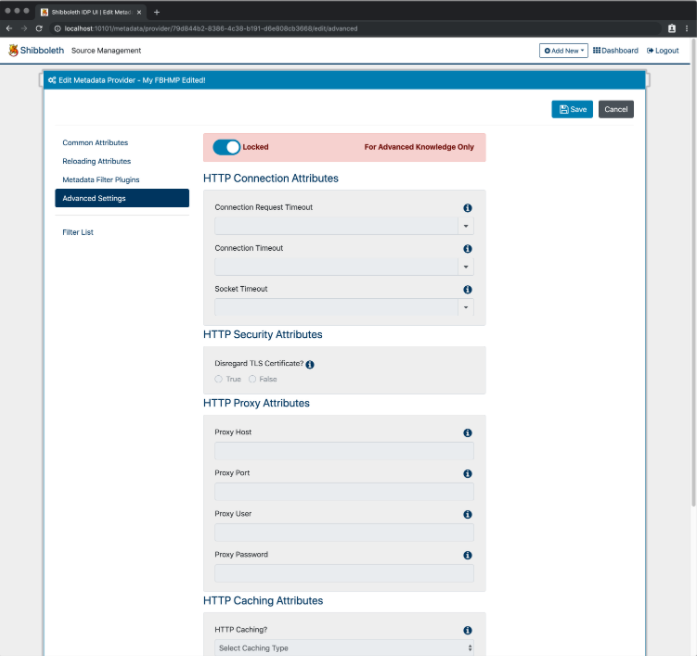
In addition to editing the information that was included during the add process for a metadata provider, Advanced Settings may also be modified. Click the Advanced Settings link in the left navigation and toggle the switch at the top of the page to unlock the fields for editing.
Note: Advanced Settings are an advanced function and should not normally need to be modified.

Filters
Filters are attached to a specific metadata provider. A list of filters is displayed at the bottom of the metadata provider configuration page. The sequence of filters in the list can be modified by clicking the up/down arrows to the left of the filter name. Click the Add Filter link to add a new filter to the metadata provider.

Add Filter
After you click Add Filter, you will be prompted to select the filter type. The options for the filter type are:
- EntityAttributes
- NameIDFormat
Once the filter type is selected, the page will expand to display the data fields that can be entered for that filter type.
On each page, fields that require information to be entered are denoted by a '*' at the end of the description for the field.

Filter Page Examples
EntityAttributes

NameIDFormat

Update Filter
To update an existing filter, click the filter name in the filter list. The filter information will be displayed below the row for the filter selected. Click the Edit link to display the filter page for update. Click the Delete link to remove the filter from the filter list.

Versioning/Comparison
Filters do not have a separate version number to select from version history. When metadata provider versions are selected, the filters corresponding to each metadata provider version selected are displayed below the metadata provider data at the bottom of the page.
Metadata Provider Version History

Metadata Filter Comparison selection
The order of the filters may not be the same for each metadata provider. Click the checkbox next to the corresponding filters (same filter name) to compare the values for the filter. The differences will the be displayed.


User Maintenance
Users can be added using two methods. The first method is to include the users in the user file during application deployment. The second method is to insert your IdP in front of the Shibboleth IdP UI application. You can publish a link to individuals you would like to use the application. When they receive the link, they can sign in to the application. The first time a user accesses the application, the user will see a "user request received" notification as shown below, and the new user will be displayed on the administrator Action Required dashboard as shown below.

Once a new user request has been received, the Administrator can assign a role or delete the request. Click the role to display the available roles as shown below. The appropriate role can then be assigned.

If Delete Request is clicked, a confirmation message will be displayed as shown below. You can then confirm or cancel the deletion.
